All Categories
Featured
Table of Contents
- – Replace Rv Flooring Anaheim, CA
- – OCRV Center
- – Awnings For Rv Anaheim, CA
- – Rv Dinette Table Anaheim, CA
- – Replace Rv Flooring Anaheim, CA
- – Rv Interior Furniture Anaheim, CA
- – Rv Restoration Companies Anaheim, CA
- – Awnings For Rv Anaheim, CA
- – Rv Sofa Sleeper Anaheim, CA
- – Rv Chairs Anaheim, CA
- – Replacement Windows For Campers Anaheim, CA
- – Motorhome Carpets Anaheim, CA
- – Rv Dining Table Anaheim, CA
- – OCRV Center
Replace Rv Flooring Anaheim, CA
Whether you're wanting to add more storage, produce a comfy nook, or merely upgrade the look, a dining room restoration can substantially improve your recreational vehicle living experience. Prior to we study the "after" pictures of RV dining room conversions, you might be questioning specifically just how to get rid of a recreational vehicle dining cubicle. Well, it ends up it's fairly basic: you try to find screws and eliminate them.
Below is a picture of a Recreational vehicle dining booth being removed. You'll possibly also need to fill some openings in your wall surface, which you can do with some spackling.
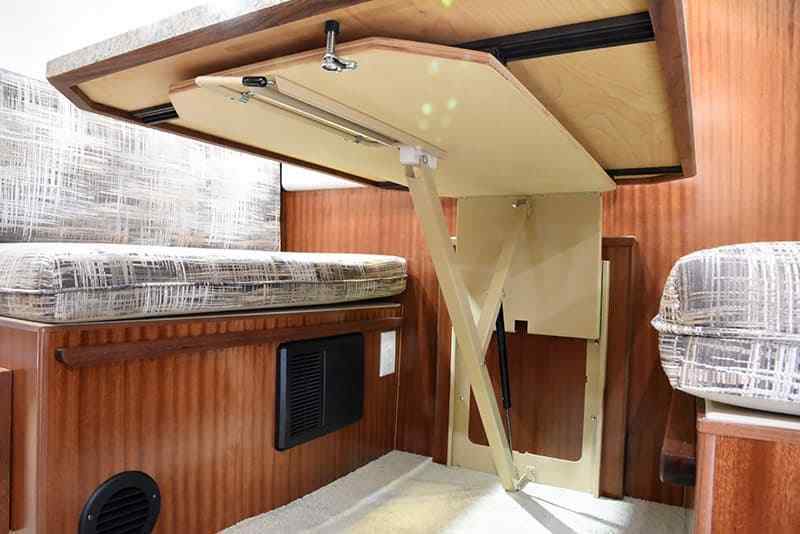
Things do not move around while your Motor home is in activity. If only 2 people ever rest at your eating table, you can conserve space in your Recreational vehicle by replacing the 4-person dinette with a table for 2, which is a great alternative for producing more area.
Awnings For Rv Anaheim, CA
The brand-new table was covered with a wetness and scratch-resistant veneer to make certain longevity and long life. When it comes to picking a dinette table for your Recreational vehicle, the choices are as varied as the Recreational vehicles themselves.
Typical wood tables supply a cozy, cozy feeling, ideal for producing a pleasant atmosphere in your dinette location. On the various other hand, modern-day glass tables can offer your motor home a streamlined, contemporary look, making the room really feel more open and ventilated. For those looking for resilience, steel tables are a durable choice that can endure the rigors of recreational vehicle traveling.
Rv Dinette Table Anaheim, CA
Wall-mounted tables are one more fantastic option, particularly for Motor homes with restricted space, as they can be folded down when not in use. Fold-down tables use flexibility, permitting you to produce extra space as needed.
This opens up the flooring room and can still seat a pair or tiny family members. Image Credit Score: Suzanne Taylor Plus, these tables could easily double as a workdesk for a home workplace.
Replace Rv Flooring Anaheim, CA
This not just boosts the comfort but additionally maximizes the home in the recreational vehicle. This RVer got these comfy chairs off Amazon. Trendy Workdesk Chair No Tires: A classy mix of convenience and style, the removal of armrests and castors gets rid of all unnecessary design, easily matching any kind of dcor to create a perception of convenience and style, the unique black lacquered cross aluminium base with non-slip natural rubber feet affixed to each support leg to avoid scratching and slipping, perfect for offices, rooms, researches, living areas, clothing tables, parlours and dormitory.
With the appropriate spacing, this is an excellent means to maintain your storage options and still have a place to eat. Photo Debt: Suzanne Taylor Half the job with major benefits!
Rv Interior Furniture Anaheim, CA
Entirely change a space by turning the cubicle sidewards. Utilize one bench flush versus the wall and include a table and chairs. Image Credit Scores: Vieves recreational vehicle Remodels Or relocate your cubicle to the back of your trailer or fifth wheel, like in this design: Photo Credit scores: Inheritance Residences LLC This might call for rebuilding a bench seat to fit the best measurements of your area.
Open up your RV by removing the backs of your eating cubicle yet keeping the bench seats! Take into consideration including recreational vehicle dinette cushion covers to shield the staying bench seats and boost the aesthetic appeal. After eliminating the cubicle completely, this family members still desired bench-style seats, which is a fantastic choice for any kind of travel trailer.
Rv Restoration Companies Anaheim, CA
Image Credit Report: Adding an item of counter top to a kitchen can produce a brand-new eating room, allowing the dining cubicle in this RV to be eliminated and the room to be used for other furnishings. Take into consideration updating the floor covering to complement the new bar area and improve the overall aesthetic of your RV.
by David Barber by means of After getting rid of the dining cubicle from their motorhome, RV proprietors Eric and Katie constructed this incredible mix enjoyment center, dining table, desk, and fireplace, showcasing the flexibility of motor home's and enhancing the general appearance of motor home insides. You can check out just how they removed their eating booth and made it on their blog.
To make the dining area extremely adaptable, those chairs are outdoor patio furniture that can easily be relocated onto the back deck.
Photo credit: Developing a functional room in your recreational vehicle dinette area starts with thinking about the tasks you appreciate many. If you enjoy food preparation and enjoyable, prioritize a big eating table and enough storage space for your kitchen basics. On the other hand, if relaxation and reading are extra your style, a comfy dining room cubicle or a comfy seating area may be the best fit.
Awnings For Rv Anaheim, CA
Take into consideration replacing your old dinette pillows with new ones or adding vibrant chairs to develop an extra vibrant and inviting ambience. Additionally, you can transform the area into a morning meal space or a small office area, relying on your needs and choices. By maximizing your dining location, you can produce a functional and comfy room that enhances your RV life, making it a happiness to hang around in your home on wheels.
You can utilize a small table and chairs and even a dinette cubicle with an integrated table. Take into consideration including storage underneath the table or bench to keep clutter at bay and make best use of space. Including pillows and paddings in bright colors can create a pleasant and welcoming atmosphere. A dining room can be a perfect area to delight in meals, reviewed the newspaper, or simply kick back and appreciate the view.
Designing a functional dinette requires cautious factor to consider of your demands and choices. Consider the kinds of tasks you do in the dining room location, the number of people who will be using the space, and the quantity of storage and counter room you need. Take into consideration the style and aesthetic you intend to achieve, whether it's modern, conventional, or rustic.
Rv Sofa Sleeper Anaheim, CA
Exact measurements are vital to guarantee the table fits completely and enables comfy activity around the dinette location. Next, take into consideration the sort of flooring and wall surface building and construction in your RV, as this will certainly affect the installation process. For example, if your motor home has a wood flooring, you may need to utilize screws or nails to safeguard the table strongly.
You can cover a bungee cable around your table and chairs to hold them all together. Things like shelves can be secured to the wall surface.
Make certain to choose screws that are much shorter than that a person. Then you do not need to stress about it punching through your motor home's outside wall surface. Review my post concerning securing your possessions throughout travel for even more ideas! If you're still undecided on whether or not to eliminate your dining room, offer it a transformation! Locate inspiration in these posts: If you've currently planned to remove your dining room booth and just need concepts wherefore to change it with, examine out these articles: With tips from the top motor home renovators, this quickstart paint overview will certainly guarantee your motor home looks image excellent.
Unsubscribe at any time., but she still aids out as the blog site editor. Ashley invested three years living complete time in a 38-foot, 5th-wheel RV with her spouse Josiah and their cat, Cat.
Rv Chairs Anaheim, CA
Motor home Furnishings also supplies custom specialty things for the recreational vehicle market, such as window housings and wood return air vents, among others. We have actually been providing the RV market for 25+ years and are your one-stop-shop for a lot of your recreational vehicle needs.
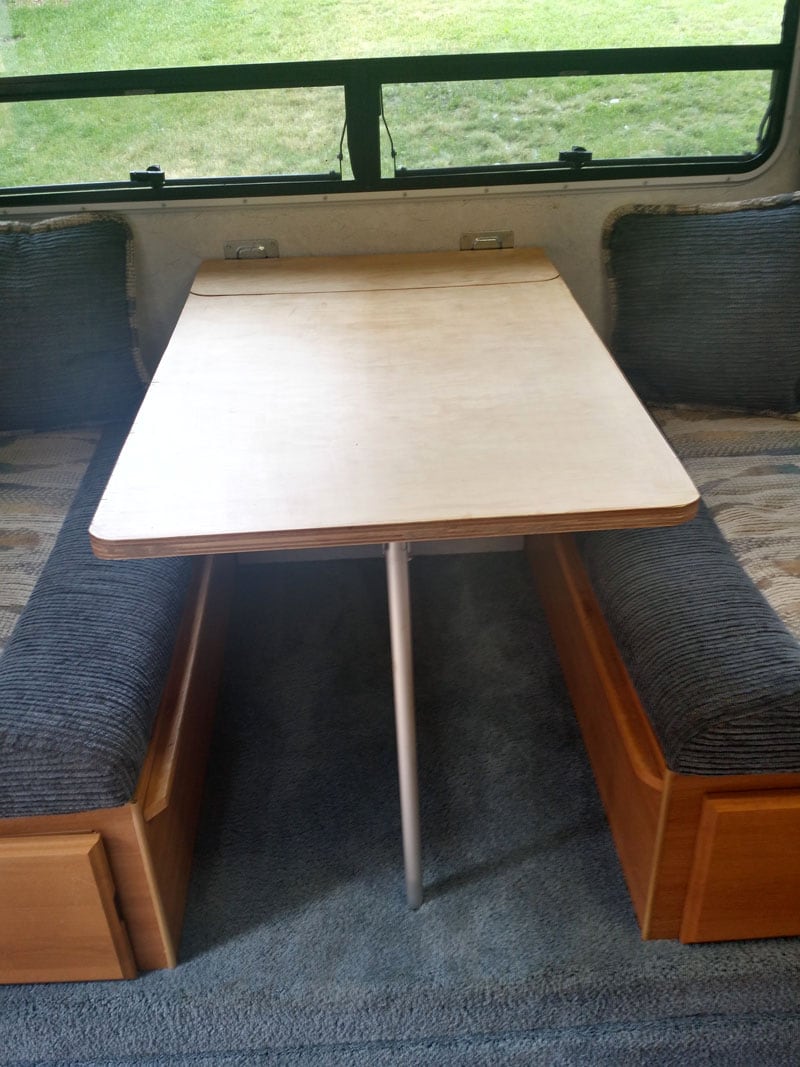
Okay, so for those people bigger people around that discover the dinette table a tight fit here is what I did. I converted it to a free standing table by adding different table legs. I went to my regional RV supplier and acquired the folding table legs that I used to carry my Rockwood Appear.
See connected PDF for pictures and documentation. It's except everyone, however I sure more than happy with it.
Okay, so for those of us bigger individuals out there that find the dinette table a tight fit right here is what I did. I converted it to a complimentary standing table by including different table legs. I mosted likely to my neighborhood motor home dealership and purchased the folding table legs that I used to have on my Rockwood Pop Up.
Replacement Windows For Campers Anaheim, CA
See affixed PDF for photos and documentation. It's except everybody, but I sure am pleased with it.
Wood seating bench with drawers, Sponge and PU for seating. Wooden and stainless steel table.
Odd. They claim on their website: "This product might set you back up to $50.00, or much more, to deliver using UPS Ground, or UPS Standard to Canada." Possibly you simply need to speak with the appropriate person and point the above out. I bought one of these tables the other day, yet to the U.S.A..
Regarding I can inform, the only actual disadvantage is that they can't be relocated outside like this table. One point that I thought might be nice was the ability to eliminate the table to access the area under the seats, however in reality there isn't any type of easy place to place the table inside the trailer, so you only get that advantage if you're prepared to relocate completely outside or place it in addition to the opposite seat.
Motorhome Carpets Anaheim, CA
As an option, if you aren't space constrained, there are likewise fold up tables, similar to this one: There is a likelihood we'll exist, and there is additionally a good possibility I'll have made a decision already concerning the Springfield/Dicor. I'll let you understand.
In my previous camper, I turned the table 45 levels to make better flow and eliminated 2 chairs. Eventually, the table and chairs came out completely when we got a real house, 3 seater, 2 reclining chair couch.
I added even more and had them all over. My present camper has the same hooks for the chairs, and I have actually included a few extra in different areas in the existing camper also.
Our team believe in supplying the best value, quality, and choice. And also, we want you to enjoy your acquisition! In the occasion you wish to send a product back to us, you might return most unused items for a reimbursement or exchange, minus delivery, within 90 days from the date of acquisition unless kept in mind listed below under exceptions and exclusions.
Rv Dining Table Anaheim, CA
For internet orders, please call our consumer service team(1-888-626-7576) to guarantee your return or exchange is recorded and any prospective concerns have actually been responded to. In the majority of instances, a return authorization will be provided, and, in every case, we'll begin to watch out for your return. For internet orders returned in-store, please take the thing in initial product packaging, in addition to the invoice to any kind of Camping Globe retail locations for a reimbursement or exchange.
Reimbursements for web orders released in-store are able to be refunded to a GIFT CARD or SENT BY MAIL CHECK ONLY; some exclusions may apply. For retail acquisitions returned with an invoice, please return the extra and unopened thing, with the original sales receipt, for a complete refund or exchange. Rv Replacement Awnings Anaheim. All returns with a gift receipt will get an installment plan for the amount of the thing at the time of purchase
OCRV Center
Address: 23281 La Palma Ave Yorba Linda, CA 92887Phone: (714) 909-1444
Email: art@ocrvcenter.com
OCRV Center
Correct ID will certainly be called for in the kind of a legitimate, state-issued chauffeur's license or state ID card. We book the right to limit or reject returns without a receipt. Excellent Sam Participants who have actually kept a constant active subscription condition may return any kind of extra and unopened item, acquired on Feb .
Rv Carpet Replacement Anaheim, CARv Dining Table Anaheim, CA
Rv Refrigerator Replacement Anaheim, CA
Replace Rv Flooring Anaheim, CA
Awning Installation Anaheim, CA
Rv Restoration Companies Anaheim, CA
Rv Replacement Awnings Anaheim, CA
Motorhome Carpets Anaheim, CA
Rv Interior Remodel Anaheim, CA
Replacement Windows For Campers Anaheim, CA
Rv Couch Anaheim, CA
Rv Carpet Replacement Anaheim, CA
Rv Carpet Replacement Anaheim, CA
Rv Restoration Companies Anaheim, CA
Replacement Windows For Campers Anaheim, CA
Rv Couch Anaheim, CA
Rv Chairs Anaheim, CA
Rv Couch Bed Anaheim, CA
Rv Couch Anaheim, CA
Awnings For Rv Anaheim, CA
Rv Sofa Beds Anaheim, CA
Remodeling Rv Anaheim, CA
Rv Couch Anaheim, CA
Awning Installation Anaheim, CA
Rv Dining Table Anaheim, CA
Rv Couch Anaheim, CA
Replacement Windows For Campers Anaheim, CA
Rv Replacement Awnings Anaheim, CA
Rv Replacement Furniture Anaheim, CA
Rv Restoration Companies Anaheim, CA
Rv Interior Furniture Anaheim, CA
Rv Carpet Installation Anaheim, CA
Rv Carpet Replacement Anaheim, CA
Replacement Windows For Rv Anaheim, CA
Rv Microwave Replacement Anaheim, CA
Replacement Windows For Rv Anaheim, CA
Rv Sofa Sleeper Anaheim, CA
Rv Replacement Awnings Anaheim, CA
Awnings For Trailers Anaheim, CA
Remodeling Rv Anaheim, CA
Rv Sofas Anaheim, CA
Rv Restoration Companies Anaheim, CA
Rv Dinette Table Anaheim, CA
Rv Couch Bed Anaheim, CA
Replacement Rv Windows Anaheim, CA
Rv Sofa Sleeper Anaheim, CA
Rv Couch Anaheim, CA
Rv Couch Anaheim, CA
Rv Sofas Anaheim, CA
Awnings For Trailers Anaheim, CA
Rv Couch Anaheim, CA
Replacement Rv Refrigerator Anaheim, CA
Replacement Rv Windows Anaheim, CA
Rv Replacement Furniture Anaheim, CA
Replacement Windows For Rv Anaheim, CA
Rv Sofas Anaheim, CA
Rv Floor Replacement Anaheim, CA
Rv Carpet Replacement Anaheim, CA
Awnings For Trailers Anaheim, CA
Rv Interior Furniture Anaheim, CA
Rv Sofas Anaheim, CA
Remodeling Rv Anaheim, CA
Rv Chairs Anaheim, CA
Rv Carpet Installation Anaheim, CA
Rv Replacement Awnings Anaheim, CA
Rv Dinette Booth Anaheim, CA
Rv Microwave Replacement Anaheim, CA
Awnings For Trailers Anaheim, CA
Rv Dinette Table Anaheim, CA
Replacement Windows For Campers Anaheim, CA
Replacement Rv Windows Anaheim, CA
Rv Restoration Companies Anaheim, CA
Awning Installation Anaheim, CA
Rv Sofa Beds Anaheim, CA
Rv Chairs Anaheim, CA
Awning Installation Anaheim, CA
Rv Replacement Awnings Anaheim, CA
Awnings For Rv Anaheim, CA
Finding A Good Seo Marketing Company Anaheim, CA
In My Area Seo Agencies Anaheim, CA
OCRV Center
Table of Contents
- – Replace Rv Flooring Anaheim, CA
- – OCRV Center
- – Awnings For Rv Anaheim, CA
- – Rv Dinette Table Anaheim, CA
- – Replace Rv Flooring Anaheim, CA
- – Rv Interior Furniture Anaheim, CA
- – Rv Restoration Companies Anaheim, CA
- – Awnings For Rv Anaheim, CA
- – Rv Sofa Sleeper Anaheim, CA
- – Rv Chairs Anaheim, CA
- – Replacement Windows For Campers Anaheim, CA
- – Motorhome Carpets Anaheim, CA
- – Rv Dining Table Anaheim, CA
- – OCRV Center
Latest Posts
Health Insurance Plans For Family Laguna Hills
Employee Benefits Outsourcing Companies Orange County
Laguna Woods Church Payroll Services
More
Latest Posts
Health Insurance Plans For Family Laguna Hills
Employee Benefits Outsourcing Companies Orange County
Laguna Woods Church Payroll Services