All Categories
Featured
Table of Contents
- – Awnings For Trailers Foothill Ranch, CA
- – OCRV Center
- – Replacement Windows For Campers Foothill Ranch...
- – Rv Dining Table Foothill Ranch, CA
- – Rv Couch Bed Foothill Ranch, CA
- – Awning Installation Foothill Ranch, CA
- – Awning Installation Foothill Ranch, CA
- – Rv Interior Furniture Foothill Ranch, CA
- – Rv Couch Foothill Ranch, CA
- – Motorhome Carpets Foothill Ranch, CA
- – Rv Dining Table Foothill Ranch, CA
- – Rv Interior Furniture Foothill Ranch, CA
- – Rv Carpet Replacement Foothill Ranch, CA
- – Replacement Rv Refrigerator Foothill Ranch, CA
- – Rv Replacement Furniture Foothill Ranch, CA
- – OCRV Center
Awnings For Trailers Foothill Ranch, CA
Another alternative? A standard couch that you could purchase for your sticks-and-bricks home. Cost-effective conventional sofas can be found at stores like IKEA and mounted in your recreational vehicle using L brackets and a few screws or screws. While we do not recommend this idea if you intend to make use of a seat belt while remaining on the sofa, those that just use their Recreational vehicle couches while sitting still can save a quite cent by going this route.
This may entail working with somebody to build the couch for you or it could indicate handling the projects on your own. Regardless, you will certainly be able to make something that perfectly suits your room and demands. Simply be prepared for a little additional price and/or time to go right into the structure and installation procedure.
Replacement Windows For Campers Foothill Ranch, CA
I approached the concern from the foot end of the bed. It was rather easy to adjust the fold-out foot sections. There are currently openings pierced, so all you need to do is back the screws out (after taking the nuts off) change the length, after that re-bolt them.
It needs to have been a pretty pricey alternative for the OP, yet I would instead remove the electric things as unnecessary, and have a working storage space location beneath. The pull out it has currently offers a wide double foot remainder but the locking assembly is so terribly developed, it should have damaged at an early stage.
The wire broke at some point in the past, most likely due to the reality that the sofa foot rest as to be completely aligned for the pin to release. I would certainly like to obtain rid of the darn thing ASAP, and a personalized like you describe would certainly be fantastic ... Let's dive in. Both of these loveseats come in numerous various colors and can be bought online and delivered straight to you.
Rv Dining Table Foothill Ranch, CA
You can likewise buy that hook to the flooring of your Motor home. You'll require to make certain any furnishings you add doesn't exceed your Recreational vehicle's weight restriction.
They weren't as well difficult to create either. If you're restoring a motorhome, you will require to take seat belts into factor to consider if any type of passengers will make use of the furnishings during traveling. Some motor home owners have bolted DIY couches to the wall surfaces or flooring with openings reduced for seatbelts, but any adjustments of this sort would be at your own discretion and prospective threat.
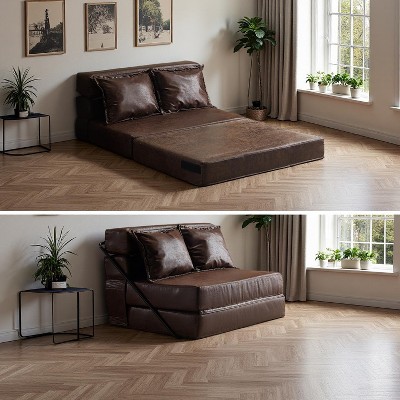
Rv Couch Bed Foothill Ranch, CA
Despite the fact that it's not a sleeper couch, we determined comfort was more crucial to us considering that we remain on our sofa everyday. On the unusual event that we have overnight guests, we put an Intex brand name self-inflating inflatable bed on the floor. Ikea is a preferred furniture resource for a whole lot of RVers due to the huge inventory and style alternatives.
This modular sleeper couch has storage space under the seats and can be configured with the chaise on either side. It likewise transforms to a bed and comes in 3 neutral colors: light gray, dark grey, and beige. The website markets lots of actually interesting, modern couches like this above That fold out to a bed that will conveniently rest two adults and features a storage space compartment.
This 54 hide-a-bed loveseat from would certainly match the original design of the majority of more recent campers and motorhomesbut at much less than half the expense. And also, it comes with a memory foam bed mattress as opposed to the common hide-a-bed cushion. If you're aiming to obtain away from the appearance of recreational vehicle factory-style style and develop an extra home-like environment in your motor home, this 57 sleeper couch is the same concept yet in a different design.
Futons are a terrific replacement alternative since they tend to be far more inexpensive than sofas and are frequently identical. This full-size futon is available in 9 different colors, consisting of neutral grey bed linen along with several brilliant velour colors. If you need a futon to fit in a smaller room, this 64 velour futon comes in several beautiful colors.
Awning Installation Foothill Ranch, CA

This one made of wood features 2 drawers for storage space along with flip-up trays on the ends. There are several color options for the mattress. You might be wondering if the weight would certainly be also hefty for a RV. This sofa considers 211 pounds with the cushion, making it just 20 extra pounds heavier than most hide-a-bed recreational vehicle sofas.
Motor home proprietor Shannon McDonald reconfigured her room so that she still has both an eating cubicle and a sofa, yet with even more couch space. She replaced her couch with this trundle daybed, after that made use of the stand from her initial dining room table with a brand-new top and two smaller sized storage space benches as seating.
Awning Installation Foothill Ranch, CA
(It can be found in great deals of different colors, also!) I bought this stretch-to-fit slipcover to makeover our couch to far better suit our design. Although I was originally skeptical that a slipcover can look excellent, this hardly looked like a slipcover in all. And the set of "put holds" I acquired to opt for it actually held it in place.
One suggestion for acquiring slipcovers: take notice of the form of the arms. Some slipcovers are made to go over bent arms (like mine pictured above), whereas others are created straight arms. One typical complaint concerning RV furniture is that it's unpleasant for grownups to sleep on especially the beds that are made from eating booth paddings.
Rv Interior Furniture Foothill Ranch, CA
Great deals of comfortable throw cushions bought from Ikea and make this a comfy place to spend a wet day while outdoor camping. Recreational vehicle proprietor Linda Tower to turned her eating booth right into a daybed also, utilizing a comforter set with matching toss pillows for a collaborated appearance. Motorhome proprietors Bill and Return of investment McGuire desired an extra comfy alternative to their jackknife couch, yet given that the couch base covered a few of the RV's mechanical components, they couldn't eliminate it altogether.
All set to replace your old sofa bed? I recommend disassembling and eliminating your furnishings in items so it can conveniently fit with your Motor home door.
This is a major influence on what you can change your sofa bed with. This has a tendency to be a bigger problem with getting rid of dining rooms.
Rv Couch Foothill Ranch, CA
She handed off the internet site to new owners in 2022 to release a new business as an on-line entrepreneur train, however she still assists as the blog site editor. Ashley spent three years living full-time in a 38-foot, 5th-wheel RV with her spouse Josiah and their cat, Cat. Her favored thing regarding RV life is the obstacle of locating the perfect way to arrange an area, and she enjoys seeing all the imaginative and smart methods people create to personalize their Motor homes.
Many thanks, Costs! We utilized a memory foam topper when our daughter stayed with us, and she stated it fit in this way. Once we relocated in permanent, though, any kind of storage area where it could fit is already in operation. It was just a bit as well large to fit inside the couch when it's done away with.
Motorhome Carpets Foothill Ranch, CA
I concur with you - if it had not been for the surface being so irregular, this wouldn't be such a problem.
Places, such as Bunkhouse RV, in RedBay Alabama do restorations all the time and have numerous, many sofas, recliners closets, etc that they have taken out of other RV's and TTs. Could be worth a check out or at the very least a phone telephone call ... I rest on it also and it sucks! What becomes the center component of the bed is means to soft. First remedy was a self blowing up outdoor camping pad placed right into a standard resting bag for enhancement comfort. Made a bed atop that combination. A renovation plus very easy to store. Second soution was a thicker air matress.
And also, can be chilly when the temps drop.i awals sleep with my head towards the kitchen as it feels as if it slopes to the rear of the trainer. Needless to claim, always trying to find something much better. Your solution looks intriguing so I will certainly investigate even more. BTW, there isn't that much elevation area under the couch.
Rv Dining Table Foothill Ranch, CA
well, i came right into a long time and cash and even some free offers and have some brand-new jobs to share. Got tired of the 4 inch pillows crushing to 0 when sleeping and the basic absence of comfort of the pleather covers ... so i figured i 'd share the remedy. in my case anyhow the sunrader has a 6 foot couchbed that becomes a twin size bed ish when prolonged.
When i opened it up it was precise suit almost to the pillows from my couch set out in bed setting. its likewise 7 inches thick; a wonderful improvement from the 4 inch crush susceptible ones. Currently i discovered i would certainly have to reduce them so i mapped off the appropriate cut line and obtained out the electric bread blade.
Next I ordered a futon cover for dimension complete ... this is to ensure that i have added material to stitch in to sub-divide the seat and backrest paddings - thats on the means. from an additional among my favored ebay.com sellers; a hubby and partner group that run a redeemed recreational vehicle parts store in S.E.
Its a nice leather system with a flip down mug holder table developed into the center seat. Replacement Rv Windows Foothill Ranch. I have decided to place that beyond of the motor home across from the original sofa. I very recommend these flip sofas for our rigs; they are terrific and have a hinge that turns the entire backrest pillow over the top and extend it on completion making a bed; when in couch setting they have storage behind the backrest for bed linen which is awesome.
Rv Interior Furniture Foothill Ranch, CA
Currently the gear will certainly have 2 huge couches that fold up right into beds along with the rooftop bed over the cab. I plan on installment this weekend break and some pics.
Bradd & Hall offers an expansive option of RV couches for sale that will certainly fit perfectly in your Motorhome, Traveling Trailer, Fifth Wheel, or Destination Trailer. Our recreational vehicle couches consists of brands like Lambright and Villa. Whether you require a motor home sofa bed or recreational vehicle jackknife sofa, we carry a variety of versions that range in dimension and features.
Rv Carpet Replacement Foothill Ranch, CA
The larger variations include facility gaming consoles with mug holders and storage. These motor home recliner chairs hold true wall surface huggers that only require 3 inches of clearance. They provide the maximum convenience, capability, and storage for a couch reclining chair. Lambright Recreational Vehicle Recliners & Cinema Seating are developed with two or 3 distinctive seats and alternatives featured or without center consoles.
The normal-sized couch will occupy an edge of area, nonetheless, the additional seats is handy when traveling with extra guests. The broadened seats is hassle-free yet comes with the expense of strolling floorspace. Rental property Dormie Sofas can be exchanged a flat location to put an air cushion on the top.
When i opened it up it was exact suit virtually to the paddings from my couch outlined in bed setting. its also 7 inches thick; a great enhancement from the 4 inch crush vulnerable ones. Currently i discovered i would certainly have to reduce them so i traced off the proper cut line and went out the electric bread blade.
Following I got a futon cover for dimension full ... this is so that i have additional product to sew in to sub-divide the seat and back-rest paddings - thats heading. from another one of my favorite ebay sellers; a hubby and partner group that run a recovered recreational vehicle parts shop in S.E.
Replacement Rv Refrigerator Foothill Ranch, CA
Its a great natural leather device with a flip down cup holder table built into the center seat. I have actually decided to put that beyond of the RV throughout from the initial couch. I extremely advise these flip couches for our gears; they are great and have a joint that flips the entire back-rest pillow over the leading and expand it on the end making a bed; when in sofa setting they have storage space behind the backrest for bedding which is awesome.
Now the gear will certainly have 2 huge couches that fold into beds along with the rooftop bed over the taxi. I intend on installment this weekend and some pics.
Bradd & Hall provides an extensive selection of RV couches up for sale that will fit completely in your Motorhome, Travel Trailer, Fifth Wheel, or Destination Trailer. Our RV sofas includes brands like Lambright and Rental property. Whether you need a recreational vehicle sleeper couch or recreational vehicle jackknife couch, we lug a range of versions that vary in dimension and functions.
The larger versions include center consoles with mug owners and storage space. These motor home recliners hold true wall huggers that just require 3 inches of clearance. They use the optimum convenience, performance, and storage space for a sofa recliner chair. Lambright RV Recliners - Replacement Rv Windows Foothill Ranch & Cinema Seats are constructed with two or 3 unique seats and alternatives come with or without center gaming consoles.
Rv Replacement Furniture Foothill Ranch, CA
OCRV Center
Address: 23281 La Palma Ave Yorba Linda, CA 92887Phone: (714) 909-1444
Email: art@ocrvcenter.com
OCRV Center
The normal-sized sofa will certainly use up a corner of space, however, the additional seats is practical when traveling with extra visitors. The increased seats is practical however features the price of walking floorspace. Suite Dormie Sofas can be exchanged a flat area to put an inflatable bed on the top.
Replacement Windows For Campers Foothill Ranch, CARv Sofa Beds Foothill Ranch, CA
Rv Carpet Installation Foothill Ranch, CA
Rv Interior Furniture Foothill Ranch, CA
Rv Chairs Foothill Ranch, CA
Rv Dinette Table Foothill Ranch, CA
Rv Carpet Replacement Foothill Ranch, CA
Rv Dining Table Foothill Ranch, CA
Rv Couch Bed Foothill Ranch, CA
Rv Restoration Companies Foothill Ranch, CA
Rv Dining Table Foothill Ranch, CA
Awnings For Trailers Foothill Ranch, CA
Rv Replacement Furniture Foothill Ranch, CA
Rv Restoration Companies Foothill Ranch, CA
Rv Dinette Table Foothill Ranch, CA
Rv Dinette Booth Foothill Ranch, CA
Replacement Windows For Campers Foothill Ranch, CA
Rv Chairs Foothill Ranch, CA
Rv Restoration Companies Foothill Ranch, CA
Rv Restoration Companies Foothill Ranch, CA
Rv Refrigerator Replacement Foothill Ranch, CA
Replace Rv Flooring Foothill Ranch, CA
Rv Interior Remodel Foothill Ranch, CA
Rv Interior Remodel Foothill Ranch, CA
Rv Floor Replacement Foothill Ranch, CA
Rv Dinette Table Foothill Ranch, CA
Rv Chairs Foothill Ranch, CA
Rv Refrigerator Replacement Foothill Ranch, CA
Replacement Windows For Rv Foothill Ranch, CA
Rv Restoration Companies Foothill Ranch, CA
Awnings For Trailers Foothill Ranch, CA
Replacement Rv Windows Foothill Ranch, CA
Rv Restoration Companies Foothill Ranch, CA
Awnings For Trailers Foothill Ranch, CA
Rv Couch Bed Foothill Ranch, CA
Rv Replacement Awnings Foothill Ranch, CA
Motorhome Carpets Foothill Ranch, CA
Rv Interior Remodel Foothill Ranch, CA
Rv Interior Furniture Foothill Ranch, CA
Rv Dining Table Foothill Ranch, CA
Rv Interior Furniture Foothill Ranch, CA
Remodeling Rv Foothill Ranch, CA
Rv Interior Furniture Foothill Ranch, CA
Rv Chairs Foothill Ranch, CA
Remodeling Rv Foothill Ranch, CA
Rv Dinette Table Foothill Ranch, CA
Rv Restoration Companies Foothill Ranch, CA
Rv Replacement Furniture Foothill Ranch, CA
Awnings For Trailers Foothill Ranch, CA
Rv Couch Foothill Ranch, CA
Motorhome Carpets Foothill Ranch, CA
Rv Microwave Replacement Foothill Ranch, CA
Rv Refrigerator Replacement Foothill Ranch, CA
Rv Refrigerator Replacement Foothill Ranch, CA
Replacement Rv Windows Foothill Ranch, CA
Rv Floor Replacement Foothill Ranch, CA
Rv Interior Furniture Foothill Ranch, CA
Replacement Rv Windows Foothill Ranch, CA
Rv Sofa Beds Foothill Ranch, CA
Motorhome Carpets Foothill Ranch, CA
Awning Installation Foothill Ranch, CA
Rv Restoration Companies Foothill Ranch, CA
Replace Rv Flooring Foothill Ranch, CA
Rv Carpet Replacement Foothill Ranch, CA
Remodeling Rv Foothill Ranch, CA
Rv Sofa Sleeper Foothill Ranch, CA
Replacement Windows For Rv Foothill Ranch, CA
Rv Dinette Booth Foothill Ranch, CA
Motorhome Carpets Foothill Ranch, CA
Rv Interior Remodel Foothill Ranch, CA
Rv Sofa Beds Foothill Ranch, CA
Awnings For Rv Foothill Ranch, CA
Rv Couch Bed Foothill Ranch, CA
Rv Replacement Awnings Foothill Ranch, CA
Rv Microwave Replacement Foothill Ranch, CA
Rv Interior Furniture Foothill Ranch, CA
Rv Interior Furniture Foothill Ranch, CA
Motorhome Carpets Foothill Ranch, CA
Affordable Seo Company Foothill Ranch, CA
Close By Seo Package Foothill Ranch, CA
OCRV Center
Table of Contents
- – Awnings For Trailers Foothill Ranch, CA
- – OCRV Center
- – Replacement Windows For Campers Foothill Ranch...
- – Rv Dining Table Foothill Ranch, CA
- – Rv Couch Bed Foothill Ranch, CA
- – Awning Installation Foothill Ranch, CA
- – Awning Installation Foothill Ranch, CA
- – Rv Interior Furniture Foothill Ranch, CA
- – Rv Couch Foothill Ranch, CA
- – Motorhome Carpets Foothill Ranch, CA
- – Rv Dining Table Foothill Ranch, CA
- – Rv Interior Furniture Foothill Ranch, CA
- – Rv Carpet Replacement Foothill Ranch, CA
- – Replacement Rv Refrigerator Foothill Ranch, CA
- – Rv Replacement Furniture Foothill Ranch, CA
- – OCRV Center
Latest Posts
Health Insurance Plans For Family Laguna Hills
Employee Benefits Outsourcing Companies Orange County
Laguna Woods Church Payroll Services
More
Latest Posts
Health Insurance Plans For Family Laguna Hills
Employee Benefits Outsourcing Companies Orange County
Laguna Woods Church Payroll Services