All Categories
Featured
Table of Contents
- – Local Rv Repair Diamond Bar, CA
- – OCRV Center
- – The Rv Repair Centre Diamond Bar, CA
- – Rv Awning Fabric Repair Diamond Bar, CA
- – Rv Blinds Repair Diamond Bar, CA
- – Rv Refrigerator Repair Diamond Bar, CA
- – Rv Fridge Repair Near Me Diamond Bar, CA
- – Local Rv Repair Diamond Bar, CA
- – Motorhome Repairs Diamond Bar, CA
- – Rv Repair Shop Diamond Bar, CA
- – Rv Repair Reviews Diamond Bar, CA
- – Rv Repair Near Me Diamond Bar, CA
- – OCRV Center
Local Rv Repair Diamond Bar, CA
Cover the area with the compound and sand it after it dries out. Constantly utilize steel screws and bolts to guarantee your repair work stand up. Roofing patching compound can be applied over any kind of screws or bolts on your recreational vehicle's roofing system to stop them from leaking. Keep this in mind for any kind of future remodellings or additions you may do.
These roof coverings can additionally spring a leak around home windows or any kind of various other elevated locations, such as air conditioners. The very best solution for fixing these is to make use of home roofing system covering. A popular brand name is Kool Seal. Make sure to get the gray variety and not the white. Kool Seal is additionally known to push back the sun and cool your RV extra effectively.
Some prominent brands consist of CoFair Quick Roof covering, Gorilla Patch, and Flex Seal Tape. Fiberglass roof coverings need an unique fiberglass repair tape. One item, called Eternabond, is very recommended for any type of type of roof.
The most common types of RV roofing system products are ethylene propylene diene monomer (EPDM), polycarbonate polyolefin (TPO), polyvinyl chloride (PVC), fiberglass, aluminum alloy, and galvanized sheet metal. There is no right or incorrect type, but each one has its very own staminas and weaknesses.
The Rv Repair Centre Diamond Bar, CA
Make certain that the roof covering sealant is devoid of splits, openings, or rips. You should additionally check the edges of the roof covering to see if there is any kind of damage around the moldings. From AC vents to roof covering rails, offer your recreational vehicle's roofing system a complete check to make certain that everything looks clean, damage-free, and protect.
Cleaning up a recreational vehicle roof is a pretty straightforward process. You'll need to move, rinse, tidy, and wash once more. The genuine success hinges on picking the very best recreational vehicle roofing system cleansing option. There are a ton of items to select from, and you ought to make certain the one you purchase is developed for the kind of motor home roof you have.
Get rid of the old sealant with a putty knife or razor. Apply the sealer to any voids or splits, as well as bolts and joints. Await it to dry (usually 24-72 hours). It's always important to have modest to major signs of damage resolved by a specialist. Contact Leisure Coachworks in Fontana, CA, at (909) 428-6775 to get in touch with a participant of our solution team.
Among the most recent and most efficient remedies for repairing your recreational vehicle's roof membrane layer is Ziollo recreational vehicle Roofing System Sealer. This item is a liquid rubber sealer that can fill fractures, quit leakages, and offer a waterproof barrier for your recreational vehicle's roof covering. It's incredibly simple to make use of and dries to a flexible, UV-resistant finish that can withstand extreme weather.
Rv Awning Fabric Repair Diamond Bar, CA
Routine assessments and prompt repair work can assist expand the life of your recreational vehicle's roofing system, conserving you from costly substitutes down the line. Remember, when it concerns motor home roofing system repair services, timely activity is essential. The sooner you address the damage, the less most likely it is to get worse over time. Experience leak complimentary & long-term repairs From $14.95 Utilized as a stand alone repair service or as part of a full RV roofing restore.

Below are some pictures of a project I did to repair roof covering rot on my 5th wheel camper. I chose to use this technique due to the fact that I could do it myself with my very own resources and abilities. Or else, a whole lot of hardware, consisting of the ladder and roofing rack, the endcap and the filon outer wall would have needed to be torn apart.
I made use of items from The Rot Medical professional. They were very helpful in discussing my options and in describing the strategies to utilized their items.
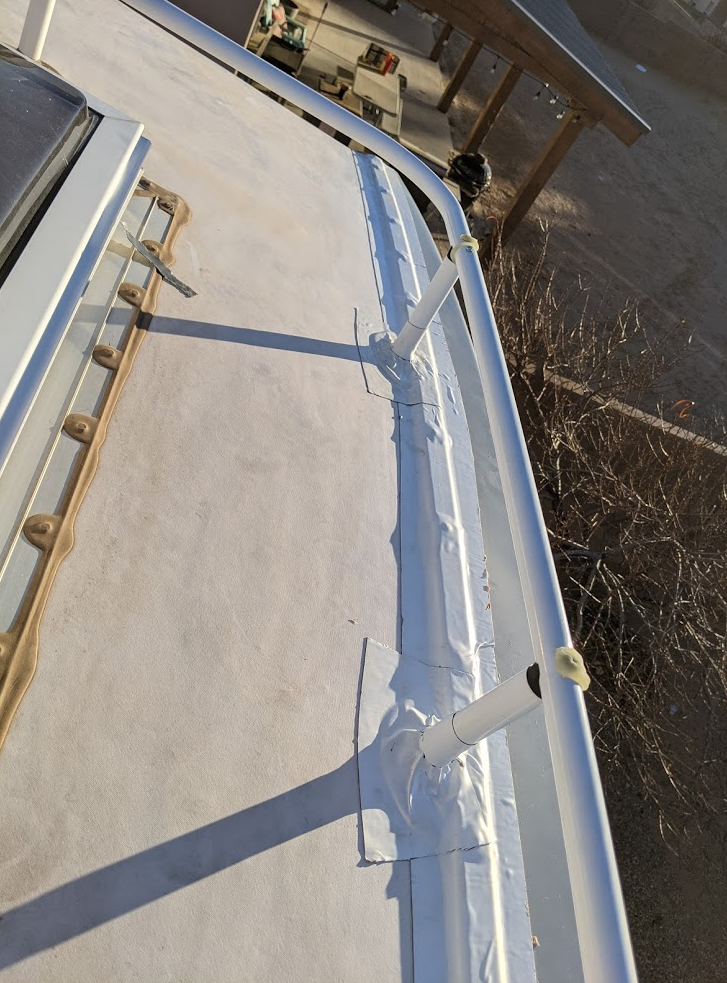
Brian N. 1. I used a box blade to cut the rubber roofing system in the corner. The leakage was simply above the pencil where the trim molding meets the end-cap. It probably dripped from the time the unit was new, as the roof was very soft in this edge, and we have actually been in dry spell conditions for two years.
Rv Blinds Repair Diamond Bar, CA
Folding back the rubber exposed the rotten location. Right here I have actually already cleaned out what soft rotted wood I could with my bare hands. Next I reduced a diagonal with a keyhole saw to cleanse up the edge where it was feathered from rot. 3. I cut an item of plywood like a challenge to match the form of the hole I made in the roof.
Absolutely nothing fancy right here. 4. Right here's the sprayer I used to apply the CPES * from The Rot Physician. With its 18 metal "stick" I might penetrate into the 2 space between the roof covering and the ceiling. I also put the stick down right into the gap in between the wall surface and the external filon to saturate the structural participants with CPES *.
Right here's the completed roofing sealed up with Eternabond tape. I ran a strip of Eternabond all the way throughout the camper where the roof meets the endcap. I likewise had rot in the wall directly listed below the location on the roofing system.
Here I have actually torn out the wall surface product and wet insulation to expose the location influenced. 8. I completely dried out the area for several days making use of the exhaust side of a small hoover, putting the tube between the inner and outer wall surfaces. When it was thoroughly dry I coated every little thing with CPES *, utilizing the insect sprayer to penetrate right into otherwise inaccessible areas.
Rv Refrigerator Repair Diamond Bar, CA
Keep in mind the leading 3-4 of the stud was entirely decayed away. I think at this moment the structure is as solid as the original manufacture. 9. I spread out Fill-It Epoxy Filler * throughout the area. Not pretty, yet after that it will be hidden later on. The stuff takes place like a thick and sticky gel, after that dries to a really tough product that bonds to the CPES * I had actually sprayed onto the timber.
Ultimately, right here's the ended up product. Overall expense had to do with $200.00 plus several hours of my time. * These items are inaccessible, we are offering comparable items that will perform these exact same jobs. Do not hesitate to contact us if you require aid with which items to use.
Rv Fridge Repair Near Me Diamond Bar, CA
Among one of the most important abilities you can master for keeping your motor home is roofing system repair work. It's very easy to disregard damage to a RV roof, yet it's one of the most important facets of camper upkeep. Most individuals that have been RVing for any kind of length of time have become accustomed to the truth that they will have to do some maintenance and repairs on their own at some point.
When it comes to postponing Recreational vehicle upkeep and repair service, one of the worst points that can occur is water damages. When there's a concern with your roof covering, it occurs rapidly.
These can deteriorate the roof material with time, damaging it. There are cleansers developed particularly for recreational vehicle roofings and each kind of material (Diamond Bar Rv Furnace Troubleshooting). If you're functioning on a large area, tape off the remainder of your RV and cover it with plastic to avoid roofing cleansers or sealants from leaking down the sides
One more thing that all motor home roofings share is the kind of repair services that they can call for. The sealant, joints, and patch holes and splits are the 3 products you can fix. If your EPDM or TPO rubber roof covering seems flaky or milky, a fresh layer of sealant is what it needs.
Local Rv Repair Diamond Bar, CA
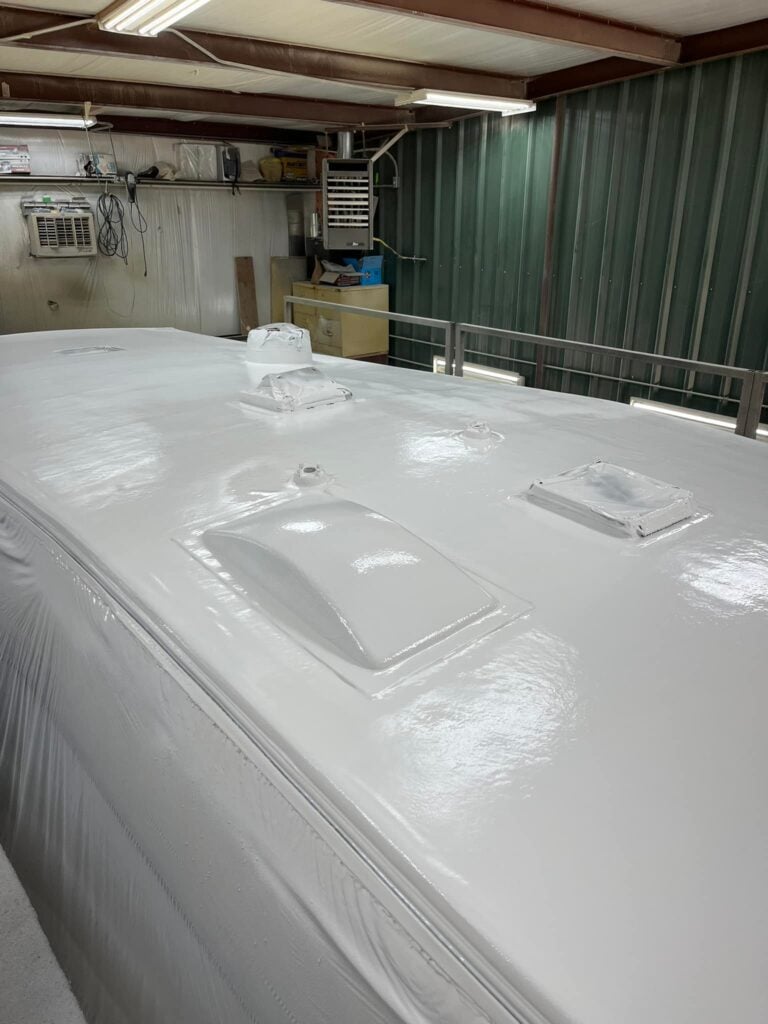
When buying the rubber roofing coverings or sealers, keep your motor home's dimensions in mind to ensure you receive the correct quantity. After cleaning the whole roof covering and permitting it to dry, use a layer of paint to the roof covering making use of a roller. Ensure to check out and comply with the guidelines on the sealant bundle for optimum prep work.
A patch will be called for if you discover a little puncture or tear on your recreational vehicle roof covering. Luckily, suppliers have actually produced repair services and RV roofing system adhesives that are straightforward to use and lasting. The majority of spots need little prep work various other than cleaning up the damaged location and applying the spot over it, just like a band-aid.
Fiberglass roofing systems' top layer, like RV rubber roofing systems', can oxidize with time, offering them a flaky, chalky look. Scrape off any type of loose, crinkled sections of the layer before cleaning and sand the roof covering's surface area using fine to tool grit sandpaper after that. The covering will certainly stick better to a slightly abraded surface area.
After the area has been smoothed and cleaned, add fiberglass spots and glue layer by layer, as guided by the repair set - Diamond Bar Rv Furnace Troubleshooting. At the end, coat your motor home with a sealant to the task and redecorate the location as required. The resealing of light weight aluminum and various other steel RV roofing systems is done with a particular finish created a light weight aluminum roof covering product
Motorhome Repairs Diamond Bar, CA
The simplest approach to repair a metal roofing system with more severe damage is to change the metal panel, which is a treatment that may vary based upon your RV. You could be able to fix your metal roofing system utilizing a peel-and-stick patch relying on the level of the damages. Make certain you pick one that is specifically planned for metal roofs, as the glue chemistry varies.
The thought of changing your motor home's roofing may be on top of your prospective RVing problems. The whole procedure can be complicated, expensive, and time consuming. If you go in understanding what to anticipate, it will be much less stressful, and you'll finish up with a shiny new roofing system offering tranquility of mind out on the roadway.
Thankfully, my Recreational vehicle roof covering substitute went easier than I anticipated. Exactly how do you understand if your roof needs to be changed?
Rv Repair Shop Diamond Bar, CA
Inside damages is a feasible indication. Check along your ceilings and wall surfaces for soft places that could suggest dampness or water leakages. Try to find bubbles in the wall surface treatments. Ceiling discolorations or spots of mildew or mold can additionally indicate water invasion. If you discover any kind of indoor damages, the next action is to determine the source of the leak.
This is when the damages was located. If you have damage to your motor home roof covering, a professional must figure out whether you're better off fixing or changing the roofing system. Fixings are cheaper upfront yet may impact the resale value of your gear. Roof substitutes are pricey but offer both value and comfort.
If somebody else has crashed right into your motor home, their insurance might potentially cover the substitute. If your guarantee or insurance coverage does not cover your roof substitute, you will certainly require to pay for it expense. If a guarantee or insurance covers the cost, you'll just have to pay the amount of your insurance deductible.
This puts on various other scenarios where damages happens, generally while the motor home isn't in procedure, such as storm damages. Your future insurance coverage prices might not increase if you're located not to be to blame. Unless you're exceptionally helpful, you'll likely need to find an expert to change your RV roofing.
Rv Repair Reviews Diamond Bar, CA
After locating a repair work store, we dropped off our travel trailer for an initial inspection. In this instance, the insurance didn't send out an adjuster out for an in-person inspection, but some companies require you to have an adjuster appearance at your Motor home roof covering to verify the damage.
From there, the roofing system service technician only provided one sort of roofing, so we didn't have any type of choices to make. In some situations, you could have numerous roofing alternatives to consider, with each offering distinctive advantages and disadvantages. Once the insurance coverage was accepted, the technician obtained to work. It may take several weeks or months to obtain your recreational vehicle's roof covering changed.
After a couple of brief weeks, our roof covering substitute was complete. A full Recreational vehicle roofing substitute typically costs several thousand dollars.
Physical influence damages from tree branches, rodent or animal damage, lack of upkeep, typical aging, adhesive failure, water damages and air intrusion. The Golden State motor home Specialists we'll work directly with your insurance coverage business to make the process as pain-free as possible. A straight time procedure, whether it is for medical diagnosis, repair service(s), or some various other weird scenario, are labor prices that undergo change.
Rv Repair Near Me Diamond Bar, CA
All labor fees are based upon the real time the technician has actually spent working with your vehicle/unit. Labor prices really do depend upon where you are situated. I'm in California, and the recreational vehicle repair work facilities in my area fee anywhere between $185 $225 per hour. In addition, not all RV roof covering substitutes are the exact same.
The cost of the roof substitute also relies on how comprehensive the damage is. Some motor home roof replacements can be done without having to replace the wood sheeting underneath the roofing membrane, while others will certainly require new sheet. It is a typical technique for repair facilities to supplement your insurer.
OCRV Center
Address: 23281 La Palma Ave Yorba Linda, CA 92887Phone: (714) 909-1444
Email: art@ocrvcenter.com
OCRV Center
A roofing system replacement is simply that, a replacement of the RV roof. All things on the roofing system are gotten rid of (A/Cs, vents, TV antenna, satellite, skylights, etc). The roofing system membrane is gotten rid of. The timber sheeting beneath the membrane is after that examined to see if it can be recycled or needs to be changed or superimposed.
Repair Rv Diamond Bar, CALocal Rv Repair Diamond Bar, CA
Rv Furnace Troubleshooting Diamond Bar, CA
Repair Rv Awning Diamond Bar, CA
Recreational Vehicle Repair Diamond Bar, CA
Rv Awning Repair Diamond Bar, CA
Motorhome Repairs Diamond Bar, CA
Rv Furnace Troubleshooting Diamond Bar, CA
Rv Blinds Repair Diamond Bar, CA
Local Rv Repair Diamond Bar, CA
Rv Refrigerator Repair Diamond Bar, CA
Awning Repair Rv Diamond Bar, CA
Rv Fridge Repair Near Me Diamond Bar, CA
Recreational Vehicle Repair Diamond Bar, CA
Rv Refrigerator Repair Diamond Bar, CA
Rv Furnace Repair Diamond Bar, CA
Rv Aluminum Siding Repair Diamond Bar, CA
Rv Refrigerator Repair Diamond Bar, CA
Motorhome Repairs Diamond Bar, CA
Repair Rv Awning Diamond Bar, CA
Rv Furnace Troubleshooting Diamond Bar, CA
Rv Awning Repair Diamond Bar, CA
Rv Electrical Repair Diamond Bar, CA
Rv Fridge Repair Near Me Diamond Bar, CA
Local Rv Repair Diamond Bar, CA
Rv Refrigerator Repair Diamond Bar, CA
Rv Repair Shop Diamond Bar, CA
Rv Electrical Repair Near Me Diamond Bar, CA
Repair Rv Diamond Bar, CA
Rv Refrigerator Repair Diamond Bar, CA
Rv Repair Shop Diamond Bar, CA
Rv Repair Shop Diamond Bar, CA
Rv Refrigerator Repair Diamond Bar, CA
Replacement Rv Awning Diamond Bar, CA
The Rv Repair Centre Diamond Bar, CA
Rv Water Damage Repair Diamond Bar, CA
Motorhome Mechanic Near Me Diamond Bar, CA
Rv Specialists Diamond Bar, CA
Repair Rv Awning Diamond Bar, CA
Rv Fridge Repair Near Me Diamond Bar, CA
Rv Electrical Repair Diamond Bar, CA
Repair Rv Awning Diamond Bar, CA
Rv Furnace Repair Diamond Bar, CA
Rv Fridge Repair Near Me Diamond Bar, CA
Rv Refrigeration Repair Diamond Bar, CA
Rv Ac Repair Near Me Diamond Bar, CA
Rv Ac Repair Near Me Diamond Bar, CA
The Rv Repair Centre Diamond Bar, CA
Replacement Rv Awning Diamond Bar, CA
Motorhome Repair Shops Near Me Diamond Bar, CA
Rv Ac Repair Near Me Diamond Bar, CA
Rv Awning Repair Near Me Diamond Bar, CA
Rv Blinds Repair Diamond Bar, CA
Rv Furnace Repair Diamond Bar, CA
Recreational Vehicle Repair Diamond Bar, CA
Rv Refrigeration Repair Diamond Bar, CA
Rv Refrigeration Repair Diamond Bar, CA
Rv Repair Shop Diamond Bar, CA
Rv Refrigeration Repair Diamond Bar, CA
Rv Water Damage Repair Diamond Bar, CA
Local Rv Repair Diamond Bar, CA
Rv Refrigeration Repair Diamond Bar, CA
Replacement Rv Awning Diamond Bar, CA
Motorhome Roof Repair Diamond Bar, CA
Rv Repair Shop Diamond Bar, CA
Rv Fridge Repair Near Me Diamond Bar, CA
Rv Repair Near Me Diamond Bar, CA
Replacement Rv Awning Diamond Bar, CA
Rv Specialists Diamond Bar, CA
Rv Repair Shop Diamond Bar, CA
The Rv Repair Centre Diamond Bar, CA
Motorhome Roof Repair Diamond Bar, CA
Motorhome Mechanic Near Me Diamond Bar, CA
Rv Electrical Repair Diamond Bar, CA
Rv Furnace Troubleshooting Diamond Bar, CA
Rv Repair Shop Diamond Bar, CA
Motorhome Repairs Diamond Bar, CA
Rv Awning Fabric Repair Diamond Bar, CA
Finding A Good Local Seo For Small Business Diamond Bar, CA
Find A Good Local Seo Near Me Diamond Bar, CA
OCRV Center
Table of Contents
- – Local Rv Repair Diamond Bar, CA
- – OCRV Center
- – The Rv Repair Centre Diamond Bar, CA
- – Rv Awning Fabric Repair Diamond Bar, CA
- – Rv Blinds Repair Diamond Bar, CA
- – Rv Refrigerator Repair Diamond Bar, CA
- – Rv Fridge Repair Near Me Diamond Bar, CA
- – Local Rv Repair Diamond Bar, CA
- – Motorhome Repairs Diamond Bar, CA
- – Rv Repair Shop Diamond Bar, CA
- – Rv Repair Reviews Diamond Bar, CA
- – Rv Repair Near Me Diamond Bar, CA
- – OCRV Center
Latest Posts
Newport Beach Best Insurance Companies For Senior Citizens
Laguna Niguel Vision Dental Insurance For Seniors
Stanton Medical Insurance For Senior
More
Latest Posts
Newport Beach Best Insurance Companies For Senior Citizens
Laguna Niguel Vision Dental Insurance For Seniors
Stanton Medical Insurance For Senior