All Categories
Featured
Table of Contents
- – Motorhome Repair Shops Fullerton, CA
- – OCRV Center
- – Rv Repair Services Near Me Fullerton, CA
- – Rv Delamination Repair Near Me Fullerton, CA
- – Rv Repair Centers Near Me Fullerton, CA
- – Motorhome Refrigerator Repair Fullerton, CA
- – Rv Repair In My Area Fullerton, CA
- – Motorhome Repair Shop Fullerton, CA
- – Rv Repair Services Near Me Fullerton, CA
- – Rv Service And Repair Near Me Fullerton, CA
- – Rv Repairs Near Me Fullerton, CA
- – Rv Repair In My Area Fullerton, CA
- – Motorhome Repair Near Me Fullerton, CA
- – Motorhome Repair Shops Fullerton, CA
- – Rv Plumbing Repair Near Me Fullerton, CA
- – OCRV Center
Motorhome Repair Shops Fullerton, CA
So following, , let's crawl under a camper. Well, I'm under the camper now, undoubtedly, and you can see over there, I've currently obtained a number of battens in place and one more one below. What I'm doing is feeling with the textile, and then there's a joist right there.
And after that, brr, brr, ought to be able to just drive some screws. The batten is just acting like a really large washing machine to make certain that that fabric does not have the opportunity to tear with and come loose.
So the following point inside right here is to search for a factor where we obtain to excellent product, and afterwards tie right into that with a new item in such a way that structurally is gon na work. And also just is basic enough to do. Allow me obtain some devices pulled with each other, and then we'll look at out with the old and in with the new below.
I have actually obtained a bad end, easily recognized, since that timber was in truly, actually bad shape. I'm looking for a part below where it obtains noise.
Rv Repair Services Near Me Fullerton, CA
If I needed to return better with the system I'm about to use right here, I would be okay with that. If in order to eliminate bad product, I had to cut down here where I'm not over a steel frame component, I would do that. What I've done so far lies the steel.
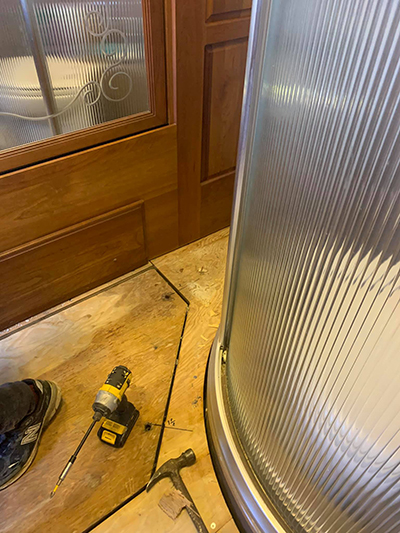
And the following point, let's obtain that bad place cut out. That went well. And I've already obtained a brand-new piece cut.
There we go. And right here's things. The key to this are pieces of scrap plywood. And the way this is gon na job is we're gon na bridge that seam with those plywood scraps. Plywood is incredibly strong things. And combined with the plywood, we're going to add adhesive and screws, which is truly gon na make this essentially much like having one lengthy item once more when we're done.
Rv Delamination Repair Near Me Fullerton, CA
I have actually obtained in my warm little hands, one more item to go on that side. I simply have to get my platform out of the way right here.
And when this is done, that is gon na be an actually, truly solid system. Below's a big moment. The last item of plywood will get placed in, yet let's talk about a pair points. Notification the insulation in the flooring. I have actually shielded the floor with what's called mineral woollen or rock woollen insulation.
This is a great application for it. Due to making use of that, that's part of the reason that I intended to make certain those battens obtained under the material. And the factor being that that mineral wool, it's obtained some thickness to it. Currently it's not that resting there, I'm worried concerning it caving in, specifically with the battens that I put underneath, however just be cognizant that if you use that it does have some weight to it, and you wan na see to it that that material under the camper is gon na sustain that.
When I'm cutting this item, the piece that's gon na fill in here, I would like to maintain the factory side on that end butting against the manufacturing facility side that's currently in area, and after that the cut side goes out below up against the wall surface. Currently, if you have to do a trim, you need to do a trim, and in this situation I did.
Rv Repair Centers Near Me Fullerton, CA
If you obtained ta do it, you got ta do it, yet it in the best world, manufacturing facility edge to manufacturing facility edge here on the lengthy joints, and on the brief seams where items are fulfilling. The various other thing is that we intend to be half on a joist. What I suggest by that is that this portion of plywood is fifty percent on this joist, and then the next item of plywood is gon na come on here, so it's got something to be secured to, and that's just a, you know, a construction standard that you constantly follow when you're doing floor covering or roofing.
There aren't any kind of portions of insulation laying on top of the framing. I have actually obtained, if you look out right here, I've got these places noted on the wall, to ensure that as I come with a screw gun, a lot more on that in a 2nd, I recognize that sleeper, that joist is there, center is there, facility exists.
I ought to have an inch and a quarter staple entering into it. I don't have a stapler that'll do that, however I do possess a screw gun that I can utilize to drive long screws. I'm doing this with a screw gun rather of a stapler. All right, a great deal of talking, and let's look at getting the plywood to come in.
Motorhome Refrigerator Repair Fullerton, CA
Well, we ended with a great deal of screwing around.The whole floor was a great deal of screwing about. Just a great deal of little fussy things to do to get this right, yet most definitely worth doing, since obviously there were some poor places in here that had to go. With those screws, if there's any place where you feel like you may've missed, obtain a conventional cordless screwdriver, back those screws out.
That deals with this flooring task, and it was intriguing, however I will certainly claim, I am thankful it's done.
Motorhome flooring substitute is a service that can boost the look of the lorry. New vinyl or rug floor is able to raise the durability and performance of the interior. Just call us and inquire about recreational vehicle floor repair currently! Customized Way is a motor home fixing shop that can promptly and effectively make RV floor replacement in Costa Mesa.
We have the right tools, understanding, and experience. Plastic is an extremely popular selection for Motor home floor covering due to its durability and convenience of maintenance. It allows you to pick an appearance that matches your individual style and the decoration of your RV.
Rv Repair In My Area Fullerton, CA
Not just will it offer the inside of your lorry a fresh, brand-new look. The rug is especially nice when you're spending long periods of time in your Motor home.
It's a good choice for Motor homes that are parked in close proximity to other cars. Carpet can give some insulation, helping to maintain your motor home warm in the wintertime and cool in the summer season. Trying to find motor home carpet installers near me? Customized Means gives solutions in recreational vehicle fixing shop in Costa Mesa and mobile motor home solutions in Orange County, The Golden State.
Our qualified service specialists boast over 35 years of RV service experience. We recognize just how vital devoted, straightforward, and trustworthy solution is and this is what we pride ourselves on. We supply solution that cares, prior to and after the sale: we take care of the reason, not simply the issue. Use the Solution Kind today to make a consultation for all of your service needs.
Motorhome Repair Shop Fullerton, CA
If you run into this problem, bring it in for a full evaluation. We'll deal with your insurance provider, offer a price quote, help address your issue and get you back to outdoor camping. If you've ever before seen a motor home manufacturer's manufacturing facility and see just how they develop Motor homes, you recognize that electric systems are complicated.
If needed, come check out us so we can obtain to the root of the problem. Having refrigerator problems in your RV can be aggravating.
Rv Repair Services Near Me Fullerton, CA
If your fridge isn't working like it should, come on in to get it looked at. Not just can we deal with regular stuff like awnings, fridges, and slide out however our body store can rebuild entire sections of your device.
If these holds true, we deal with the leading awning firms to get your recreational vehicle awning fixed. There is nothing worse than a hot summer season day without cooling, trust fund our manufacturing facility trained professionals can have your air conditioner fixed and back on the roadway with item of mind.
Rv Service And Repair Near Me Fullerton, CA
To make a visit please call one of our 3 convenient state-of-the-art highway pleasant areas or fill out the e-contact kind. Appliance Repair work (stove, heating system, fridge, AIR CONDITIONER) Awning Repair Axle Repair/ Upkeep Flooring Repair Work Roof Repair Aftermarket Accessories Setup Electrical Drawback/ Brake Installment Plumbing Propane Body Store/ Crash Center And so a lot more.
In Solution we have Licensed Recreational Vehicle Specialists, Master Certified Service Technicians, Licensed Service Writers, and Licensed Solution Managers, one of which has actually been with Little Dealership given that 1975. Little Supplier Little Prices Motor home is an accredited participant of the Better Company Bureau with an A+ ranking, the greatest readily available.
Rv Repairs Near Me Fullerton, CA
We service and repair most significant components consisting of LP Gas, electrical and pipes components. Come to the Northern Virginia Motor home expert.
provides preventative upkeep for class A and C motorhomes. Count on our experienced professionals to take care of any kind of internal or external system. Camp Ground Mobile Home Park Car Dealership (Pre-purchase Inspection) On the Side of the Roadway Any Place You Might Be Within Our Service Area is an additional of our specializeds. Nothing is even worse than being on getaway and experiencing a breakdown.
Our goal is to supply the finest RV solutions readily available at budget friendly costs. Happy to announce we currently offer RV sales & consignment.
Rv Repair In My Area Fullerton, CA
I will certainly make use of Motor home Repair service Bear once more. They took the RV right in and serviced whatever while I waited as guaranteed.
Prices was affordable and as priced estimate. I will definitely be back for servicing in the future. Middle of winter months. Snowy conditions. The furnace in my old Toyota motorhome gave up on me. Not only did they make time within 2 days to take a look at it and detect it, ends up they had the old board in supply! Repaired in four hours.
If these holds true, we function with the leading awning business to get your recreational vehicle awning taken care of. There is absolutely nothing worse than a warm summer season day without any cooling, count on our factory trained specialists can have your air conditioner repaired and back when driving with item of mind.
Motorhome Repair Near Me Fullerton, CA
To make an appointment please call among our three practical state-of-the-art freeway pleasant places (Motorhome Awning Repair Fullerton) or complete the e-contact form. Appliance Repair (stove, furnace, fridge, AIR CONDITIONING) Awning Repair Service Axle Repair Work/ Upkeep Floor Repair Work Roof Covering Fixing Aftermarket Accessories Installation Electrical Hitch/ Brake Installment Pipes Propane Body Store/ Crash Facility Therefore much more
Little Supplier Little Costs additionally has Certified Counter Staff. Accreditations: In Parts we have Licensed Parts Specialists and Qualified Components Managers. In Solution we have Certified Motor Home Technicians, Master Qualified Specialists, Qualified Service Writers, and Certified Solution Managers, one of which has been with Little Dealer given that 1975. Little Supplier Little Rates motor home is a recognized member of the Bbb with an A+ rating, the highest available.
We solution and repair most significant elements including LP Gas, electric and plumbing components. We are a totally certified and insured repair service store approving insurance coverage and guarantee cases. Involve the Northern Virginia motor home professional. We make use of the very best top quality replacement parts to get you back on the road securely and in style.
Trust our trained service technicians to take care of any type of inner or external system. Camp Ground Mobile Home Park Car Dealership (Pre-purchase Inspection) On the Side of the Roadway Anywhere You May Be Within Our Solution Area is an additional of our specialties.
Motorhome Repair Shops Fullerton, CA
Our goal is to supply the finest Recreational vehicle solutions readily available at budget-friendly prices. Satisfied to reveal we currently offer Recreational vehicle sales & consignment.
I will use recreational vehicle Repair Bear once more. Highly Recommend! Brought my motor home in for an oil change on the train and generator. They took the recreational vehicle right in and serviced whatever while I waited as assured. They also put in the time to check all my liquids, tire stress, and generator installs to make sure whatever was safe.
Rv Plumbing Repair Near Me Fullerton, CA
Prices was affordable and as estimated. I will certainly be back for servicing in the future. Center of wintertime. Snowy conditions. The heating system in my old Toyota motorhome quit on me. Not just did they make time within 2 days to consider it and identify it, ends up they had the old board in supply! Taken care of in 4 hours.
Rv Solar Installation Fullerton, CARv Floor Repair Near Me Fullerton, CA
Rv Repair Services Near Me Fullerton, CA
Rv Generator Repair Fullerton, CA
Rv Delamination Repair Near Me Fullerton, CA
Rv Repair Services Near Me Fullerton, CA
Motorhome Generator Repair Near Me Fullerton, CA
Rv Mechanics Near Me Fullerton, CA
Motorhome Repair Shop Fullerton, CA
Motorhome Repair Near Me Fullerton, CA
Camper Ac Repair Near Me Fullerton, CA
Motorhome Repair Shops Fullerton, CA
Rv Repair Places Near Me Fullerton, CA
Rv Delamination Repair Near Me Fullerton, CA
Motorhome Generator Repair Near Me Fullerton, CA
Rv Floor Repair Near Me Fullerton, CA
Motorhome Repair Near Me Fullerton, CA
Best Rv Repair Near Me Fullerton, CA
Full Service Rv Repair Near Me Fullerton, CA
Rv Refrigerator Repair Near Me Fullerton, CA
Motorhome Refrigerator Repair Fullerton, CA
Rv Delamination Repair Near Me Fullerton, CA
Motorhome Service And Repair Near Me Fullerton, CA
Motorhome Refrigerator Repair Fullerton, CA
Camper Ac Repair Near Me Fullerton, CA
Rv Repair And Service Near Me Fullerton, CA
Rv Plumbing Repair Near Me Fullerton, CA
Motorhome Generator Repair Near Me Fullerton, CA
Rv Repair Service Near Me Fullerton, CA
Rv Repair And Service Near Me Fullerton, CA
Rv Service And Repair Near Me Fullerton, CA
Motorhome Repair Shops Fullerton, CA
Rv Solar Installation Fullerton, CA
Rv Ceiling Repair Fullerton, CA
Camper Ac Repair Near Me Fullerton, CA
Rv Repair In My Area Fullerton, CA
Rv Service Repair Near Me Fullerton, CA
Rv Ceiling Repair Fullerton, CA
Rv Repair In My Area Fullerton, CA
Rv Repair Places Near Me Fullerton, CA
Rv Service And Repair Near Me Fullerton, CA
Motorhome Repair Shops Fullerton, CA
Rv Repair Services Near Me Fullerton, CA
Camper Ac Repair Near Me Fullerton, CA
Motorhome Generator Repair Near Me Fullerton, CA
Rv Repair Services Near Me Fullerton, CA
Rv Repair Service Near Me Fullerton, CA
Motorhome Repair Near Me Fullerton, CA
Rv Refrigerator Repair Near Me Fullerton, CA
Motorhome Repair Service Fullerton, CA
Motorhome Awning Repair Fullerton, CA
Rv Solar Installation Fullerton, CA
Rv Repair In My Area Fullerton, CA
Rv Repair Services Near Me Fullerton, CA
Rv Delamination Repair Near Me Fullerton, CA
Camper Ac Repair Near Me Fullerton, CA
Rv Repair Services Near Me Fullerton, CA
Motorhome Awning Repair Fullerton, CA
Motorhome Repair Service Fullerton, CA
Rv Generator Repair Fullerton, CA
Rv Repair Places Near Me Fullerton, CA
Camper Ac Repair Near Me Fullerton, CA
Motorhome Generator Repair Near Me Fullerton, CA
Rv Repair Places Near Me Fullerton, CA
Rv Repair Service Near Me Fullerton, CA
Motorhome Repair Shop Fullerton, CA
Rv Repair Centers Near Me Fullerton, CA
Rv Repair Centers Near Me Fullerton, CA
Rv Solar Installation Fullerton, CA
Camper Ac Repair Near Me Fullerton, CA
Rv Repair In My Area Fullerton, CA
Rv Generator Repair Fullerton, CA
Full Service Rv Repair Near Me Fullerton, CA
Rv Mechanics Near Me Fullerton, CA
Motorhome Repair Shop Fullerton, CA
Rv Repair Services Near Me Fullerton, CA
Rv Repair Services Near Me Fullerton, CA
Full Service Rv Repair Near Me Fullerton, CA
In Seo Pricing Fullerton, CA
In My Area Seo Consultant Fullerton, CA
OCRV Center
Table of Contents
- – Motorhome Repair Shops Fullerton, CA
- – OCRV Center
- – Rv Repair Services Near Me Fullerton, CA
- – Rv Delamination Repair Near Me Fullerton, CA
- – Rv Repair Centers Near Me Fullerton, CA
- – Motorhome Refrigerator Repair Fullerton, CA
- – Rv Repair In My Area Fullerton, CA
- – Motorhome Repair Shop Fullerton, CA
- – Rv Repair Services Near Me Fullerton, CA
- – Rv Service And Repair Near Me Fullerton, CA
- – Rv Repairs Near Me Fullerton, CA
- – Rv Repair In My Area Fullerton, CA
- – Motorhome Repair Near Me Fullerton, CA
- – Motorhome Repair Shops Fullerton, CA
- – Rv Plumbing Repair Near Me Fullerton, CA
- – OCRV Center
Latest Posts
Health Insurance Plans For Family Laguna Hills
Employee Benefits Outsourcing Companies Orange County
Laguna Woods Church Payroll Services
More
Latest Posts
Health Insurance Plans For Family Laguna Hills
Employee Benefits Outsourcing Companies Orange County
Laguna Woods Church Payroll Services