All Categories
Featured
Table of Contents
- – Rv Service And Repair Near Me West Covina, CA
- – OCRV Center
- – Rv Delamination Repair Near Me West Covina, CA
- – Rv Repairs Near Me West Covina, CA
- – Full Service Rv Repair Near Me West Covina, CA
- – Motorhome Awning Repair West Covina, CA
- – Rv Repair Centers Near Me West Covina, CA
- – Rv Floor Repair Near Me West Covina, CA
- – Rv Repair Shops Near My Location West Covina...
- – Best Rv Repair Near Me West Covina, CA
- – Motorhome Refrigerator Repair West Covina, CA
- – Motorhome Generator Repair Near Me West Covi...
- – Rv Repair Service Near Me West Covina, CA
- – Rv Service And Repair Near Me West Covina, CA
- – Rv Repair And Service Near Me West Covina, CA
- – OCRV Center
Rv Service And Repair Near Me West Covina, CA
So next, um, allow's crawl under a camper. Well, I'm under the camper now, certainly, and you can see there, I have actually currently obtained a couple of battens in position and an additional one right here. What I'm doing is really feeling via the material, and then there's a joist right there.
And then, brr, brr, must be able to just drive some screws. Oh yep, so it behaves. The batten is simply acting like an actually huge washer to ensure that that textile doesn't have the possibility to tear with and come loose. That is most definitely going to hold that in place.
The next point inside here is to look for a point where we obtain to excellent material, and after that link right into that with a new item in a method that structurally is gon na job. And additionally simply is easy sufficient to do. So, allow me get some tools gathered, and afterwards we'll consider out with the old and in with the brand-new below.
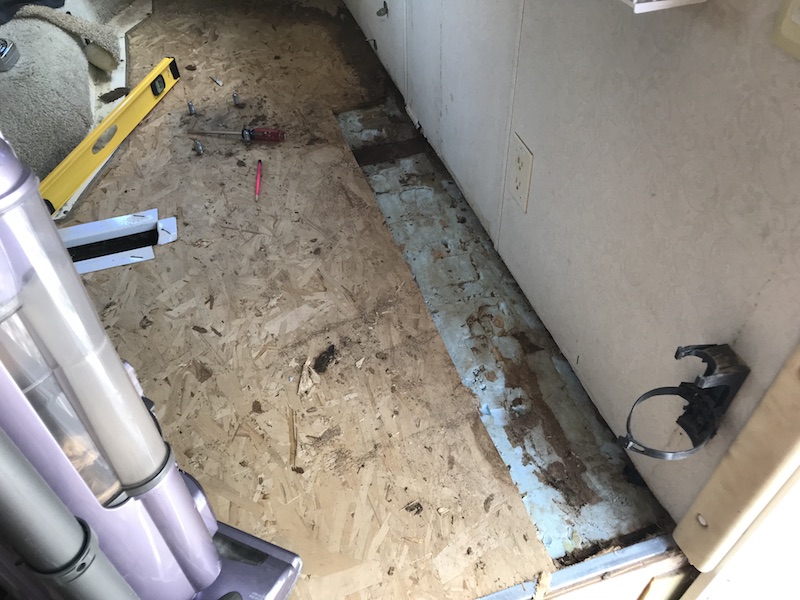
I have actually got a bad end, easily identified, because that timber was in really, really poor form. And after that just considering the remaining lumber right here. I'm seeking a component below where it obtains audio - Motorhome Repair Near Me West Covina. Currently, the various other thing I understand is that beneath here, right there is a steel element of the trailer.
Rv Delamination Repair Near Me West Covina, CA
If I needed to come back additionally with the system I'm about to use right here, I would be all right with that. If in order to get rid of poor product, I needed to cut down here where I'm not over a steel framework part, I would do that. What I've done so much lies the steel.
And the following thing, let's get that bad area removed. Jigsaw is a terrific tool for that. And what I wish to do as I cut is likewise lift a little bit. I wan na make certain the jigsaw blade does not penetrate the membrane down below. That went well. And I've already obtained a new piece cut.
The trick to this are pieces of scrap plywood. And the means this is gon na job is we're gon na bridge that seam with those plywood scraps. And coupled with the plywood, we're going to add glue and screws, and that is truly gon na make this primarily simply like having one long piece again when we're done.
Rv Repairs Near Me West Covina, CA
The last thing we desire is for the plywood to finish up standing happy with the two-by material. Bridge that seam about uniformly. I have entered my hot little hands, an additional piece to go on that side. I simply have to obtain my system out of the way here.
And when this is done, that is gon na be a really, really solid system. The last item of plywood is about to obtain placed in, but allowed's talk concerning a pair things.
Due to the fact that of using that, that's component of the reason that I desired to make certain those battens obtained under the textile. And the reason being that that mineral woollen, it's obtained some density to it.
When I'm cutting this piece, the item that's gon na fill up in below, I would like to keep the manufacturing facility side on that end butting versus the manufacturing facility edge that's already in area, and then the cut edge goes out below up against the wall. Currently, if you need to do a trim, you need to do a trim, and in this situation I did.
Full Service Rv Repair Near Me West Covina, CA
So if you got ta do it, you got ta do it, however it in the best world, manufacturing facility side to factory edge here on the lengthy joints, and on the brief seams where pieces are fulfilling. The other thing is that we wish to be half on a joist. So what I imply by that is that this chunk of plywood is half on this joist, and then the next piece of plywood is gon na begin right here, so it's got something to be secured to, which's simply a, you know, a building and construction standard that you constantly follow when you're doing floor covering or roof covering.
There aren't any pieces of insulation laying on top of the framework. I have got, if you keep an eye out right here, I have actually obtained these areas marked on the wall surface, so that as I come along with a screw weapon, extra on that in a second, I understand that sleeper, that joist is there, center is there, facility exists.
I ought to have an inch and a quarter staple entering into it. I do not have a stapler that'll do that, however I do possess a screw weapon that I can utilize to drive long screws. So I'm doing this with a screw weapon as opposed to a stapler. All right, a lot of speaking, and allow's look at getting the plywood to come in.
Motorhome Awning Repair West Covina, CA
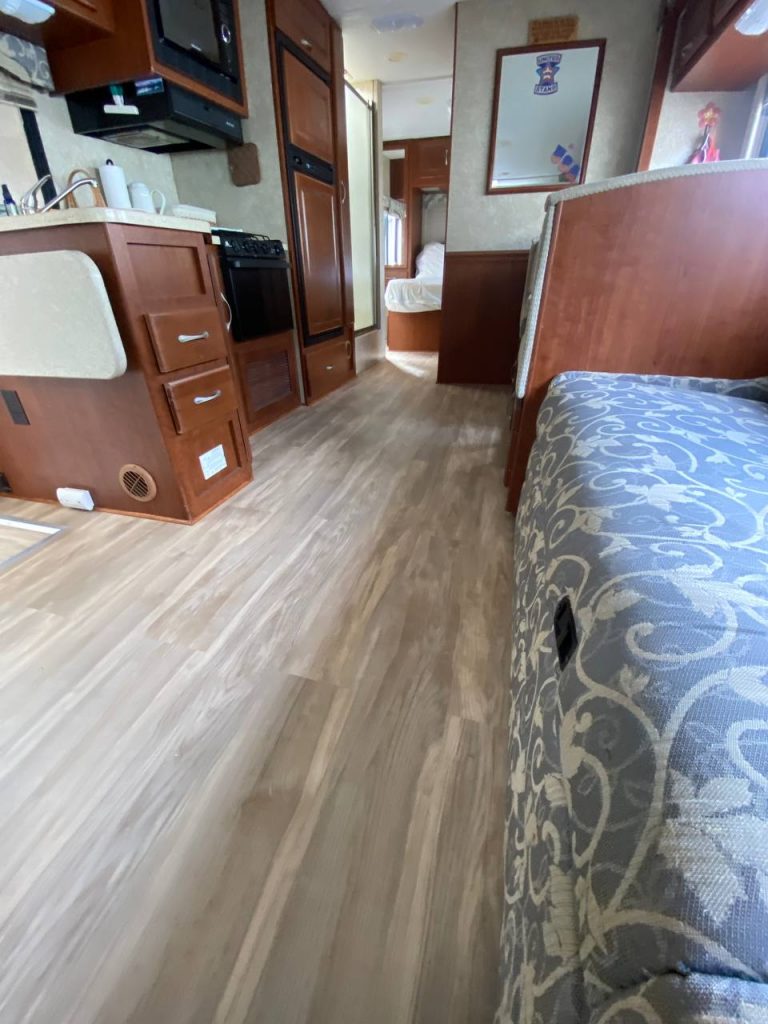
Well, we finished with a great deal of screwing around.The entire flooring was a great deal of screwing around. Simply a great deal of little fussy things to do to obtain this right, yet most definitely worth doing, because obviously there were some poor areas in right here that had to go. With those screws, if there's any location where you seem like you might've missed out on, get a basic cordless screwdriver, back those screws out.
That cares for this flooring task, and it was intriguing, however I will certainly say, I am grateful it's done.
Simply call us and ask about rv flooring fixing currently! Personalized Way is a Recreational vehicle repair shop that can quickly and successfully make RV floor substitute in Costa Mesa.
We have the right devices, understanding, and experience. Vinyl is a very prominent option for RV flooring because of its resilience and simplicity of upkeep. It is a water resistant material that is resistant to put on and tear. Plastic floor covering is available in a variety of styles and shades. It enables you to pick an appearance that matches your individual style and the decoration of your recreational vehicle.
Rv Repair Centers Near Me West Covina, CA
Not just will it offer the inside of your vehicle a fresh, new appearance. The rug is specifically good when you're spending long periods of time in your Motor home.
So it's a great selection for Motor homes that are parked near to other automobiles. Carpeting can offer some insulation, assisting to maintain your motor home cozy in the wintertime and cool in the summer. Seeking motor home carpeting installers near me? Custom-made Method provides services in motor home service center in Costa Mesa and mobile RV solutions in Orange Area, California.
Our qualified solution professionals boast over 35 years of recreational vehicle solution experience. We recognize how vital dedicated, honest, and reputable solution is and this is what we satisfaction ourselves on. We supply service that cares, before and after the sale: we take care of the reason, not just the issue. Utilize the Solution Form today to make a consultation for every one of your solution demands.
Rv Floor Repair Near Me West Covina, CA
If you run into this problem, bring it in for a full examination. We'll function with your insurer, offer a quote, help solve your issue and obtain you back to camping. If you've ever visited a RV supplier's factory and see exactly how they build RVs, you understand that electrical systems are complicated.
If required, come visit us so we can obtain to the root of the issue. Having fridge issues in your Recreational vehicle can be irritating.
Rv Repair Shops Near My Location West Covina, CA
If your fridge isn't functioning like it should, come on in to obtain it checked out. Crashes and water leaks happen. They can do more damage than an easy fix can do! That's where we can assist. Motorhome Repair Near Me West Covina. Not only can we deal with typical stuff like awnings, refrigerators, and slide out but our body store can reconstruct whole areas of your unit.
If these holds true, we function with the leading awning business to get your recreational vehicle awning taken care of. There is nothing worse than a hot summer season day with no air conditioning, trust fund our factory trained technicians can have your air conditioning fixed and back when driving with item of mind.
Best Rv Repair Near Me West Covina, CA
To make a visit please call one of our three hassle-free advanced freeway friendly areas or fill up out the e-contact type. Home appliance Fixing (oven, heater, refrigerator, AIR CONDITIONING) Awning Repair Axle Repair/ Maintenance Flooring Repair Work Roof Repair Work Aftermarket Accessories Setup Electrical Hitch/ Brake Installment Pipes Propane Body Shop/ Crash Facility Therefore much extra.
Little Supplier Little Costs additionally has Certified Counter Staff. Accreditations: In Components we have Licensed Parts Specialists and Qualified Parts Supervisors. In Service we have Qualified RV Technicians, Master Qualified Service Technicians, Qualified Service Writers, and Certified Service Managers, among which has been with Little Dealer because 1975. Little Supplier Little Prices motor home is a recognized member of the Bbb with an A+ ranking, the greatest readily available.
Motorhome Refrigerator Repair West Covina, CA
We solution and repair service most major elements consisting of LP Gas, electric and pipes elements. We are a fully licensed and insured service center approving insurance coverage and warranty claims. Concern the Northern Virginia motor home professional. We utilize the finest high quality replacement parts to get you back when traveling safely and in vogue.
Depend on our trained service technicians to fix any type of interior or external system. Camp Ground Mobile Home Park Car Dealership (Pre-purchase Evaluation) On the Side of the Roadway Anywhere You Might Be Within Our Solution Location is another of our specializeds.
Our goal is to use the finest Motor home solutions available at budget-friendly prices. Delighted to introduce we currently provide Recreational vehicle sales & consignment.
Motorhome Generator Repair Near Me West Covina, CA
I will certainly utilize RV Repair work Bear again. Extremely Recommend! Brought my RV in for an oil adjustment on the instructor and generator. They took the motor home right in and serviced every little thing while I waited as promised. They also took the time to check all my liquids, tire pressures, and generator installs to make sure whatever was safe.
I will certainly be back for servicing in the future. Not only did they make time within 48 hours to look at it and detect it, turns out they had the old board in supply! Dealt with in four hours.
If these is the situation, we deal with the leading awning business to obtain your RV awning fixed. There is nothing worse than a hot summer season day without a/c, trust our manufacturing facility trained service technicians can have your ac fixed and back when traveling with item of mind.
Rv Repair Service Near Me West Covina, CA
To make a consultation please call among our three convenient cutting edge highway pleasant areas (Motorhome Repair Near Me West Covina) or load out the e-contact type. Appliance Fixing (oven, heater, fridge, AC) Awning Repair Work Axle Repair Service/ Upkeep Flooring Fixing Roofing Repair Work Aftermarket Add-on Setup Electrical Hitch/ Brake Installment Plumbing Lp Body Store/ Accident Facility Therefore far more
Little Dealership Little Prices likewise has Qualified Counter Personnel. Certifications: In Components we have Qualified Parts Specialists and Certified Components Managers. In Solution we have Qualified Recreational Vehicle Service Technicians, Master Certified Professionals, Certified Solution Writers, and Certified Service Supervisors, among which has been with Little Supplier given that 1975. Little Supplier Little Prices motor home is a recognized participant of the Better Service Bureau with an A+ ranking, the highest offered.
We solution and fixing most major parts consisting of LP Gas, electrical and pipes parts. Come to the Northern Virginia Motor home expert.
Trust our trained service technicians to take care of any type of internal or external system. Camp Ground Mobile Home Park Dealer (Pre-purchase Assessment) On the Side of the Roadway Anyplace You May Be Within Our Service Location is an additional of our specializeds.
Rv Service And Repair Near Me West Covina, CA
Our objective is to offer the very best motor home services readily available at budget-friendly costs. Delighted to announce we currently offer recreational vehicle sales & consignment. We are currently building our stock, yet we can help you if you are attempting to offer your unit. We are able to provide consignment sales. Offer us a call and we can assist you out.
I will certainly use RV Fixing Bear once again. Very Suggest! Brought my RV in for an oil modification on the coach and generator. They took the motor home right in and serviced every little thing while I waited as guaranteed. They likewise put in the time to inspect all my liquids, tire pressures, and generator installs to make certain everything was risk-free.
Rv Repair And Service Near Me West Covina, CA
Prices was practical and as priced quote. I will absolutely be back for maintenance in the future. Center of winter. Snowy problems. The furnace in my old Toyota motorhome gave up on me. Not only did they make time within 2 days to take a look at it and diagnose it, ends up they had the old board in supply! Fixed in 4 hours.
Rv Ceiling Repair West Covina, CAMotorhome Repair Service West Covina, CA
Rv Service Repair Near Me West Covina, CA
Rv Generator Repair West Covina, CA
Rv Repair And Service Near Me West Covina, CA
Motorhome Repair Service West Covina, CA
Rv Floor Repair Near Me West Covina, CA
Motorhome Repair Shop West Covina, CA
Rv Ceiling Repair West Covina, CA
Motorhome Repair Shops West Covina, CA
Best Rv Repair Near Me West Covina, CA
Motorhome Repair Shops West Covina, CA
Rv Plumbing Repair Near Me West Covina, CA
Camper Ac Repair Near Me West Covina, CA
Rv Service Repair Near Me West Covina, CA
Rv Service Repair Near Me West Covina, CA
Rv Repair And Service Near Me West Covina, CA
Rv Delamination Repair Near Me West Covina, CA
Motorhome Awning Repair West Covina, CA
Motorhome Repair Shop West Covina, CA
Motorhome Repair Shops West Covina, CA
Rv Repair Service Near Me West Covina, CA
Rv Repair Services Near Me West Covina, CA
Full Service Rv Repair Near Me West Covina, CA
Full Service Rv Repair Near Me West Covina, CA
Rv Repair Places Near Me West Covina, CA
Motorhome Repair Service West Covina, CA
Rv Solar Installation West Covina, CA
Motorhome Repair Shop West Covina, CA
Rv Plumbing Repair Near Me West Covina, CA
Rv Mechanics Near Me West Covina, CA
Rv Repair Places Near Me West Covina, CA
Rv Floor Repair Near Me West Covina, CA
Motorhome Repair Shop West Covina, CA
Rv Plumbing Repair Near Me West Covina, CA
Full Service Rv Repair Near Me West Covina, CA
Rv Repair Services Near Me West Covina, CA
Motorhome Repair Service West Covina, CA
Motorhome Service And Repair Near Me West Covina, CA
Rv Repair Shops Near My Location West Covina, CA
Motorhome Service And Repair Near Me West Covina, CA
Motorhome Awning Repair West Covina, CA
Rv Plumbing Repair Near Me West Covina, CA
Rv Service Repair Near Me West Covina, CA
Rv Generator Repair West Covina, CA
Rv Refrigerator Repair Near Me West Covina, CA
Rv Ceiling Repair West Covina, CA
Motorhome Repair Shops West Covina, CA
Rv Repairs Near Me West Covina, CA
Motorhome Repair Shops West Covina, CA
Rv Floor Repair Near Me West Covina, CA
Rv Floor Repair Near Me West Covina, CA
Rv Repair Services Near Me West Covina, CA
Motorhome Refrigerator Repair West Covina, CA
Rv Repairs Near Me West Covina, CA
Rv Generator Repair West Covina, CA
Rv Repair Centers Near Me West Covina, CA
Motorhome Repair Near Me West Covina, CA
Rv Repair And Service Near Me West Covina, CA
Motorhome Generator Repair Near Me West Covina, CA
Rv Repairs Near Me West Covina, CA
Rv Repairs Near Me West Covina, CA
Motorhome Repair Shop West Covina, CA
Camper Ac Repair Near Me West Covina, CA
Rv Refrigerator Repair Near Me West Covina, CA
Rv Mechanics Near Me West Covina, CA
Motorhome Service And Repair Near Me West Covina, CA
Rv Solar Panel Installation West Covina, CA
Full Service Rv Repair Near Me West Covina, CA
Rv Service Repair Near Me West Covina, CA
Motorhome Generator Repair Near Me West Covina, CA
Rv Repair Services Near Me West Covina, CA
Motorhome Generator Repair Near Me West Covina, CA
Motorhome Repair Service West Covina, CA
Rv Generator Repair West Covina, CA
Rv Ceiling Repair West Covina, CA
Rv Repair Centers Near Me West Covina, CA
Rv Repair Places Near Me West Covina, CA
Near You Seo Services For Business West Covina, CA
Near Here Seo Management West Covina, CA
OCRV Center
Table of Contents
- – Rv Service And Repair Near Me West Covina, CA
- – OCRV Center
- – Rv Delamination Repair Near Me West Covina, CA
- – Rv Repairs Near Me West Covina, CA
- – Full Service Rv Repair Near Me West Covina, CA
- – Motorhome Awning Repair West Covina, CA
- – Rv Repair Centers Near Me West Covina, CA
- – Rv Floor Repair Near Me West Covina, CA
- – Rv Repair Shops Near My Location West Covina...
- – Best Rv Repair Near Me West Covina, CA
- – Motorhome Refrigerator Repair West Covina, CA
- – Motorhome Generator Repair Near Me West Covi...
- – Rv Repair Service Near Me West Covina, CA
- – Rv Service And Repair Near Me West Covina, CA
- – Rv Repair And Service Near Me West Covina, CA
- – OCRV Center
Latest Posts
Truck Shops Near Me Guasti
Rv Chairs Tustin
Emergency Swamp Cooler Repair Beverly Hills
More
Latest Posts
Truck Shops Near Me Guasti
Rv Chairs Tustin
Emergency Swamp Cooler Repair Beverly Hills