All Categories
Featured
Table of Contents
- – Camper Air Conditioner Repair Near Me Fullerton...
- – OCRV Center
- – Camper Service And Repair Fullerton, CA
- – Camping Repair Near Me Fullerton, CA
- – Camper Repair Shop Near Me Fullerton, CA
- – Pop Up Camper Repair Near Me Fullerton, CA
- – Pop Up Camper Repair Fullerton, CA
- – Camper Services Fullerton, CA
- – Camper Repair Places Near Me Fullerton, CA
- – Camper Repair Shop Near Me Fullerton, CA
- – Camper Repair Fullerton, CA
- – Camper Repair Shops Near Me Fullerton, CA
- – Camper Trailer Repair Fullerton, CA
- – Camper Air Conditioner Repair Near Me Fuller...
- – OCRV Center
Camper Air Conditioner Repair Near Me Fullerton, CA
Which implies I'll end getting rid of those edge trim items all the means down. I had a substantial amount of water damage in the joint in between the rounded corner and the roof covering deck.
It's simply popping with the staples. Lastly the side of the roofing system decking is revealed at the rear of the camper! OK! I've subjected the roof covering substrate at the back side of the camper. Now its time to locate the leading edge. Exact same offer once more. Remove some screws from the edge trim holding back the fiberglass panel.
Once more, I pried that layer up as well (there had not been much quieting but glue at this point) and afterwards I could yank out the rest of the rubber roof that was glued beneath it. Currently I can draw out the last little bit of rubber roofing from beneath the fiberglass and luan plywood.
Camper Service And Repair Fullerton, CA
I saw there were no bolts holding the roofing plywood down. It was simply glued. I began carefully peeling it up. I might see the blue styrofoam insulation under the damaged locations of luan plywood on the roofing. Notification there are no bolts whatsoever holding down the roof covering plywood! It is totally glued.
The whole point began to draw up cleanly in one piece without damaging the foam board insulation at all. Then the plywood started peeling up as one item, leaving all the styrofoam well intact.
There is a metal enhanced tape on the bottom that signs up with the assemble. I don't understand exactly how exactly they handled to glue every little thing down so well and get this tape joining them from the underside, yet it was well done. The items of roof ply are collaborated at the joints beneath with a metal-reinforced tape.
Camping Repair Near Me Fullerton, CA
I swiftly recognized the roof covering was losing toughness and stiffness as I drew up the top layer, so cracked it off prior to the first joint. A close up of the metal framing in the roofing: one inch wide, one and a fifty percent inches high. Here's a detail of the electrical wiring in the insulation foam and the solid wood supports where the antennas screw into the roof.
Looking at all-time low of the roofing ply I eliminated you can see that it had a very total glue bond with heaven foam in-between, producing a strong lamination impact. Below is an illustration I made that information just how the roofing is created, just how the roofing framing jobs, and just how all the layers are overlapped at the front and rear of the RV rubber roof covering.
Camper Repair Shop Near Me Fullerton, CA
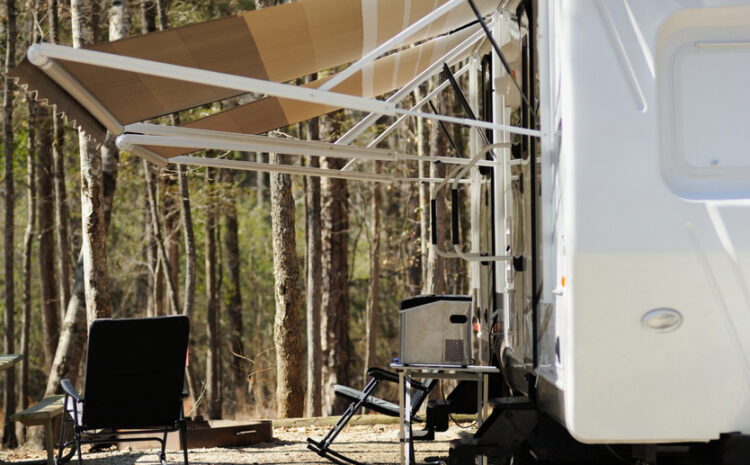
Both most usual kinds of recreational vehicle awnings on rigs today are: Side-frame awnings, with vertical frame sustains mounted down the side of the motor home. The various other kind are side "floating" arm awnings with less frame framework. They use horizontal awning assistance arms placed only near the top of the motor home.
There is discussion as to which frame and running design is better. Yet, we won't open that RVing can-of-worms here! Please go into a legitimate e-mail address. A mistake occurred. Please try once again later on. RVers love their awnings for numerous factors: recreational vehicle awnings supply convenience and color from the warm summertime sunlight.
"An ounce of prevention deserves a pound of cure." That old claiming likewise uses to your motor home awning. To expand the life of your awning, and keep it looking great, regular maintenance and cleaning is required. Thankfully, there is not a great deal entailed with daily maintenance of motor home awnings and frames.
A good silicone dry-lube spray is also advised. that hold your awning together and affixed to your RV. Do this regularly, tightening them as needed. As your motor home rolls down the freeway, taking in every bump, split, and pothole, things can loosen up in time. Many awnings have change screws and bolts that permit you to set recommended angles for essentially shade.
Pop Up Camper Repair Near Me Fullerton, CA
Make sure to wear eye protection while looking up and scrubbing the awning. Rub both the top and bottom of the awning.
Repair tape fix for small to tool tears. (Picture: Erik Anderson) An important first step is cleaning up the fixing area well to make sure great attachment of the tape or spot. We recommend putting the patch both ahead and under of the damaged area. You'll wish to rub the repair patch firmly on both sides to create a strong bond.
Make certain your tape or patch does not have square corners. Cut the edges in a span for better long-lasting bond. Square edges have a propensity to even more easily raise and peel off, shortening the life of your recreational vehicle awning repair work. We hate to think of it, I recognize, however sometimes the only thing to do is change your motor home awning textile.
Pop Up Camper Repair Fullerton, CA
Ideally, you must get awning textile that is hefty obligation and uses the finest UV defense that your budget allows. Be sure to shop around.: Getting your awning material online may appear easiest.
You and your helpers will certainly slide the new awning material right into the top and reduced channels. Placement it effectively and secure it in the networks. Restore stress to the material, structure, and roller tube. Examination for correct motor home awning operation. Readjust material placing as required. New fabric replacement is complete.
As a DIY job, you can conserve cash and possible loss of use of your recreational vehicle if you or else required to leave it at a shop. There you have it! Appropriate treatment and upkeep of your RV awning can prolong it's life and keep it useful. Currently it's time to turn out that awning, sit back on your camping site in the amazing shade, and reeeelax! This message may consist of associate links or state our own products, please look into our disclosure policy right here.
Camper Services Fullerton, CA
Damages to your RV awning can range from tiny rips and openings to serious wear that jeopardizes the integrity of the textile. The technique of fixing normally relies on the extent of the damage and the kind of material. Patching is a common method of fixing tiny to huge splits or openings.
For a very easy fixing, ensure the tape covers a location bigger than the damage and that the glue matches your awning's textile kind. Strings are possibly the very best choice for splitting up at the sides or where added stamina is needed. This technique is specifically reliable for acrylic awnings, where the breathable material can stand up to needlework without endangering its integrity.
Camper Repair Places Near Me Fullerton, CA
If the damage is also comprehensive to sew or sew, awning substitute textile might be the only sensible solution. Normally when there is heavy mold and mildew, the mold and mildew, or fabric, comes to be fragile and rips in lots of areas. Replacement awnings provide the chance to update materials or layout, enhancing the appearance and functionality of your motor home.
I believe it's appropriate at the side that is still showing when the awning is rolled up. Another option may be if you can discover a furniture or canvas shop ready to do it, you can probably take the material off (google for guidelines) and have them cut off the damaged part and resew the "grain" (really called "Keder welt") back on to it.
Hopefully, you can capture your own before the product or assistances are to the point of requiring replacement. More than likely, if a rip is less than 3 feet, you can repair the product. If that's the instance, start your troubleshooting by judging the dimension of Motor home awning repair work required below.
Make an awning inspection before any camping trip. Begin any kind of assessment by washing the awning on both the bottom and topside.
Camper Repair Shop Near Me Fullerton, CA
Do not use just any tape nonetheless, later on, we advise a couple of sorts of tape to make use of. Conversely, camping tent patch sets work great for awning material too. For little holes and rips, tape repair work can often in 2014, depending on what created the damage. With time, awning textiles or stitching compromise in the sunlight and will certainly come to be weak.
Discover matching fabric to cover the tear, and utilize durable glue that works with your fabric. Generally, this is a plastic concrete. Bonds in Tough Problems You can apply our American madeSturdy and Versatile Our very concerned HH-66 Vinyl CementRepair Numerous Types of Plastic Usage HH-66 Vinyl Cement forSometimes, if the stitching string is not UV-resistant sufficient, it can fail.
If the damage is too substantial to repair thoroughly, you could have to change the whole awning textile item. Doing an on the internet search will certainly produce how-to videos you can follow to DIY awning textile replacement.
Provided that there are so many different kinds of awnings we can not cover each right here, but once more a google and youtube search normally will yield good DIY outcomes. If your repair service is only a small opening there are a few committed awning repair work tapes that work quite well.
Camper Repair Fullerton, CA
Sale Fix TEARS & RIPS IN AWNINGS, CANVAS, TENTS & MORE: Our clearWATERPROOF & CLIMATE RESISTANT: Our material repair service tape works as aULTRA-DURABLE & FLEXIBLE YET TEAR RESISTANT: Our clear fabricFor larger repair work, a larger more powerful tape is suggested. We highly suggest gorilla tape weatherproof clear 4-inch broad tape (Camper Air Conditioner Repair Near Me Fullerton). This stuff is very sticky and solid and stands up to all climate condition and water
Rain will certainly run straight off it, but allow the awning completely dry extensively before rolling it up, as caught moisture is the perfect environment for mold. The price of vinyl substitute can range from $150 to over $1,000 depending upon the dimension and thickness of the product. This awning topper may be lengthened by cutting the torn sides and taping them, however more than likely, the sun damage is way too much, and it will certainly require changing.
This sounded fantastic for the range of outdoor camping problems we locate ourselves in. Plus, their items feature a 5-year warranty, need to last 10 to 15 years, and are made in Brush Prairie, Washington, United States. Tough Top Awnings additionally provides estimates exactly on their website after you fill out some measurements and specs, plus any devices you need for your setup.
Camper Repair Shops Near Me Fullerton, CA
Prices are going to vary according to the high quality, product type, and size of your awning. Vinyl and acrylic textiles cost about the exact same per square backyard, differing from $150 to $400 for slide awnings and $450 to $1,200 for complete awnings, depending on size and thickness.
Find matching fabric to cover the tear, and make use of sturdy glue that works with your textile. Typically, this is a vinyl concrete. Bonds in Difficult Problems You can apply our American madeSturdy and Flexible Our highly pertained to HH-66 Vinyl CementRepair Multiple Kinds Of Plastic Usage HH-66 Vinyl Concrete forSometimes, if the sewing string is not UV-resistant sufficient, it can fail first.
If the damage is as well considerable to repair completely, you might have to change the entire awning material piece. Doing an on-line search will produce how-to videos you can follow to DIY awning textile substitute.
Camper Trailer Repair Fullerton, CA
Given that there are many different sorts of awnings we can not cover each right here, yet again a google and youtube search usually will produce excellent DIY results. Think about These Cool Girard Motor Home Awnings That Have No Support Arms for your motor home. If your repair is only a tiny hole there are a couple of specialized awning repair tapes that function pretty well.
Sale Service TEARS & RIPS IN AWNINGS, CANVAS, TENTS & EVEN MORE: Our clearWATERPROOF & WEATHER RESISTANT: Our fabric repair work tape works as aULTRA-DURABLE & FLEXIBLE YET SPLIT RESISTANT: Our clear fabricFor bigger repairs, a larger stronger tape is suggested. We highly suggest gorilla tape weatherproof clear 4-inch wide tape. This things is super sticky and solid and holds up to all climate condition and water.
Rainfall will certainly run straight off it, yet allow the awning completely dry completely before rolling it up, as trapped dampness is the ideal environment for mold and mildew. The cost of vinyl substitute can range from $150 to over $1,000 relying on the size and density of the material. This awning topper may be prolonged by trimming the torn edges and taping them, yet probably, the sun damages is also a lot, and it will require changing.
This appeared terrific for the range of outdoor camping problems we locate ourselves in. And also, their products come with a 5-year warranty, need to last 10 to 15 years, and are made in Brush Meadow, Washington, USA. Challenging Leading Awnings additionally provides estimates right on their site after you fill out some dimensions and requirements, plus any type of devices you require for your installment.
Camper Air Conditioner Repair Near Me Fullerton, CA
Prices are going to vary according to the top quality, product kind, and dimension of your awning. Plastic and acrylic textiles set you back regarding the exact same per square backyard, differing from $150 to $400 for slide awnings and $450 to $1,200 for full awnings, depending on dimension and density.
Camper Air Conditioner Repair Near Me Fullerton, CACamper Services Fullerton, CA
Camper Repair Shop Fullerton, CA
Camper Trailer Repair Fullerton, CA
Camper Repair Near Me Fullerton, CA
Camper Repair Fullerton, CA
Camper Repair Shop Fullerton, CA
Camper Air Conditioner Repair Near Me Fullerton, CA
Camper Repair Near Me Fullerton, CA
Camper Service Center Fullerton, CA
Pop Up Camper Canvas Repair Fullerton, CA
Camper Awning Replacement Fullerton, CA
Camper Repair Fullerton, CA
Camper Repair Shops Near Me Fullerton, CA
Camper Roof Repair Fullerton, CA
Pop Up Camper Repair Near Me Fullerton, CA
Camper Repair And Service Fullerton, CA
Camper Repair Shops Near Me Fullerton, CA
Rv Camper Repair Fullerton, CA
Camper Repair And Service Fullerton, CA
Camper Service And Repair Fullerton, CA
Camper Repair Fullerton, CA
Pop Up Camper Roof Repair Fullerton, CA
Pop Up Camper Canvas Repair Fullerton, CA
Camper Repair Fullerton, CA
Camper Roof Repair Fullerton, CA
Camper Repair Places Near Me Fullerton, CA
Camping Repair Near Me Fullerton, CA
Camper Service Center Fullerton, CA
Camper Roof Repair Near Me Fullerton, CA
Camper Roof Repair Near Me Fullerton, CA
Camper Roof Repair Near Me Fullerton, CA
Camper Repair Places Near Me Fullerton, CA
Rv Camper Repair Fullerton, CA
Camper Air Conditioner Repair Near Me Fullerton, CA
Camper Repair And Service Fullerton, CA
Camper Service Center Fullerton, CA
Camper Repair Fullerton, CA
Camper Service And Repair Fullerton, CA
Camper Awning Repair Fullerton, CA
Pop Up Camper Roof Replacement Fullerton, CA
Camper Roof Repair Near Me Fullerton, CA
Camper Repair And Service Fullerton, CA
Camper Service And Repair Fullerton, CA
Camper Repair Shop Near Me Fullerton, CA
Camper Service Near Me Fullerton, CA
Camper Service Near Me Fullerton, CA
Camper Repair Shop Near Me Fullerton, CA
Pop Up Camper Canvas Repair Fullerton, CA
Camper Roof Repair Near Me Fullerton, CA
Rv Camper Ac Repair Fullerton, CA
Camping Repair Near Me Fullerton, CA
Rv Camper Repair Near Me Fullerton, CA
Camper Trailer Repair Near Me Fullerton, CA
Camper Repair Shop Fullerton, CA
Pop Up Camper Repair Fullerton, CA
Camper Repair Shops Near Me Fullerton, CA
Camper Roof Repair Fullerton, CA
Camper Roof Replacement Fullerton, CA
Pop Up Camper Canvas Repair Fullerton, CA
Pop Up Camper Roof Replacement Fullerton, CA
Pop Up Camper Repair Fullerton, CA
Camper Repair Places Near Me Fullerton, CA
Camper Repair Shops Near Me Fullerton, CA
Pop Up Camper Roof Replacement Fullerton, CA
Camper Repair And Service Fullerton, CA
Pop Up Camper Roof Replacement Fullerton, CA
Camper Trailer Repair Fullerton, CA
Pop Up Camper Roof Repair Fullerton, CA
Pop Up Camper Canvas Repair Fullerton, CA
Camper Trailer Repair Fullerton, CA
Pop Up Camper Repair Fullerton, CA
Camper Service Near Me Fullerton, CA
Camper Services Fullerton, CA
Camper Repair Fullerton, CA
Pop Up Camper Repair Fullerton, CA
Pop Up Camper Repair Fullerton, CA
Camper Repair And Service Fullerton, CA
Finding A Good Seo Companies Fullerton, CA
Find A Seo Consultant Fullerton, CA
OCRV Center
Table of Contents
- – Camper Air Conditioner Repair Near Me Fullerton...
- – OCRV Center
- – Camper Service And Repair Fullerton, CA
- – Camping Repair Near Me Fullerton, CA
- – Camper Repair Shop Near Me Fullerton, CA
- – Pop Up Camper Repair Near Me Fullerton, CA
- – Pop Up Camper Repair Fullerton, CA
- – Camper Services Fullerton, CA
- – Camper Repair Places Near Me Fullerton, CA
- – Camper Repair Shop Near Me Fullerton, CA
- – Camper Repair Fullerton, CA
- – Camper Repair Shops Near Me Fullerton, CA
- – Camper Trailer Repair Fullerton, CA
- – Camper Air Conditioner Repair Near Me Fuller...
- – OCRV Center
Latest Posts
Photography For Weddings Eastvale
Pioneertown Care For Elderly
Alzheimer Care Thousand Palms
More
Latest Posts
Photography For Weddings Eastvale
Pioneertown Care For Elderly
Alzheimer Care Thousand Palms