All Categories
Featured
Table of Contents
- – Pop Up Camper Roof Replacement Guasti, CA
- – OCRV Center
- – Camper Trailer Repair Near Me Guasti, CA
- – Camper Services Guasti, CA
- – Rv Camper Ac Repair Guasti, CA
- – Camper Repair And Service Guasti, CA
- – Camper Service Guasti, CA
- – Camper Service And Repair Guasti, CA
- – Camper Repair Guasti, CA
- – Camping Repair Near Me Guasti, CA
- – Pop Up Camper Repair Guasti, CA
- – Camper Service Center Guasti, CA
- – OCRV Center
Pop Up Camper Roof Replacement Guasti, CA
Whether you look for adventurous family members trips 3 or four times a year, a seasonal getaway, or you're retired and crave the flexibility to live the rest of your life checking out the country full time, the recreational vehicle way of life will certainly obtain you there. It's a home on wheels, and numerous people across the country have actually purchased or plan to spend in a motorhome, camper, traveling trailer, or another sort of recreational vehicle.
It's a box on wheels. Complete of appliances. And systems. And lp. And you drive it 65mph down the freeway. Something is bound to break at some time or an additional. And that are you mosting likely to call when it does? It's not Ghostbusters. You could take it to the RV solution facility or shop.
And it's best of all. What if I told you that you can fix it on your own? We understand repairing things yourself is incredibly frightening, but if they can do it, so can you.
You can get going today. We can help. Leveraging his understanding, the group at The Digital Camping area created, an online motor home upkeep training course that shows you (yes, you!) whatever you need to learn about your motor home to maintain it effectively preserved and road ready. Conserve you 1000s out of commission expenses Conserve you from the problem of managing service facilities and technologies that do not understand much concerning Recreational vehicles Assist you stay rational and tranquil when something breaks Safeguard your financial investment Get rid of the overwhelming "I don't know anything" sensation you have every single time something makes a strange sound or breaks in your RV Make you one of the most experienced individual at the campfireand most likely one of the most prominent, too Repair It Yourself is a journey that takes you from not knowing much concerning your motor home (if anything) to knowing all the systems in your recreational vehicle and teaching you how to repair and service them.
Camper Trailer Repair Near Me Guasti, CA
Your RV is self-supporting. Simply like a runner takes treatment of his feet, an RVer needs to take care of her tires.
Perhaps the most frightening & complicated systems in your rig. These video clips are all regarding providing you the self-confidence to recognize you're not going to blow something up.
This course was produced with the day-to-day RVer in mind. If you recognize what a screwdriver is, you're mosting likely to be a camping site superstar by the end of the training course. Repair It Yourself was developed by a group so it isn't just some techy used cars and truck technician person standing there informing you what you need to do making use of words you can not actually understand.
Camper Services Guasti, CA
And the information is burglarized simple, bite-sized pieces that provide you a total picture of your rig and what to do. He's been to college and has worked with many models and makes. He's helped people face to face, and through video clip phone call and is utilized to aiding people find out how to fix Recreational vehicles themselves.
And we used a skilled instructor to see to it he talks in terms that educate you what to do. No much more chatting heads, monotonous material, and long videos where you're never mosting likely to remember what was stated. We have only had 2 goals for this course: you take this course and recognize just how to repair your RV.
Rv Camper Ac Repair Guasti, CA
Liz, his partner and founder of The Virtual Campground, comes in at the end of each module to ask inquiries and get additional details if required. You know, because she's a previous instructor who is simply attempting to be thorough.not micromanaging or anything. Ed spent months in school training to work with RVs and obtain his accreditation.
He is very made use of to showing individuals remotely, much like in this program. For every single good video around on YouTube for recreational vehicle upkeep, there are 3-5 awful ones. For you, YouTube does not need its customers to submit accurate info or be licensed to show. This program however, is assured to include excellent and trustworthy information in language you can really recognize.
Camper Repair And Service Guasti, CA
It's okay there on the course dashboard when you purchase. Yikes. This is awkward, but yeah You can request a complete refund up to thirty days after acquisition. We want you to trust us and guarantee if this isn't ideal for you, we'll give you your cash back without harassment or sense of guilt.
We actually want you to feel supported and certain in fixing your rig. All RVs damage ultimately. And without a strategy in place, you're going to invest thousands and waste traveling time waiting for somebody else to fix your gear.
Camper Service Guasti, CA
Not only will you learn the systems of your recreational vehicle. You'll have the ability to repair your recreational vehicle with confidence, recognizing you can get back to outdoor camping quickly when the time comes. And you'll have a recreational vehicle tech who has dealt with thousands of various other RVers and their rigs to stroll you with the process.
Our Restoration & Collision Group Can Aid Make Your Motor home Perfect The appropriate window treatment can significantly change the inside of your Recreational vehicle. Blinds Day-Night Tone Curtains & Personal Privacy Curtains Power Tone Windshield Sunlight Screens The furnishings your Recreational vehicle begins with isn't the furnishings you have to live with.
We can set up every one of the following: Sofas Sofa Beds Recliners Captain Chairs Every person requirements storage area, which's where kitchen cabinetry is available in. If you're interested in changing or upgrading your cabinetry, we're greater than happy to assist (Camper Roof Repair Guasti). We concentrate on the complying with cabinets solutions: Closet Upgrades Apartment Screen TV Cabinets Cabinet Repair service Flooring doesn't last for life and if you intend to upgrade or merely transform your RV's flooring, allow our specialists install your new flooring properly
Our improvement group can not only aid you pick the very best devices for your motor home however mount them. Devices we commonly replace consist of: Refrigerators Microwaves Ovens and Ranges Washers and Dryers If you intend to update your tap or sink, our group can help. We will certainly eliminate the old tap and sink and mount the brand-new one.
Camper Service And Repair Guasti, CA
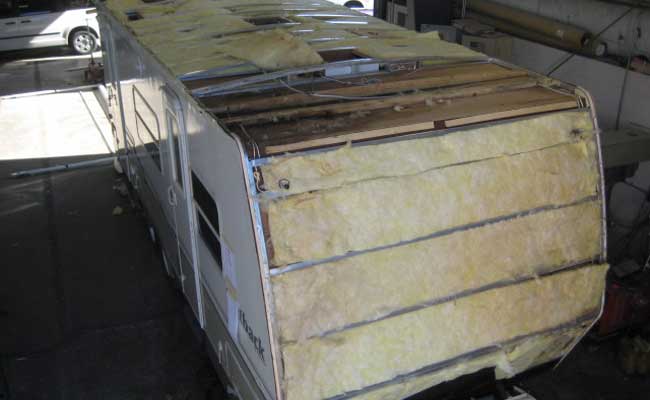
Our restoration group will get rid of and dispose of the old cushions and get your brand-new cushions set up. Inside ceiling panels don't last for life, and if they have actually been damaged in any way they will certainly need to be changed.
Home window coverings are one point, yet at some point, your RV is mosting likely to require new home windows altogether. Our specialist home window installers are up to the job. Allow us eliminate your RV's old exterior windows and mount some new and more energy-efficient home windows in their location. The outside of your recreational vehicle takes a whipping.
Camper Repair Guasti, CA
We can do both paint and graphics or simply get rid of and replace the graphics on your Recreational vehicle if they're peeling off for faded. Keeping your RV clean and all set for the road is no simple feat.
Let us keep it wonderful. Whether your motor home's awning requires simply a little treatment or a full substitute, we can aid. Let us do an evaluation and after that recommend the finest strategy. Icing up temperatures can seriously harm your motor home's drain and water supply. If this occurs to you, let our team of solution experts evaluate the damages and change your recreational vehicle's water supply's parts as required.
We can assess the issue and take the essential steps to fix it. Typical water damage service includes: Seal Technology Water Leak Discovery Wall Surface Replacement and Repair Service Floor Replacement and Fixing Ceiling Replacement and Repair Service Rodents and various other little pests will likely attempt to make a home for themselves inside your recreational vehicle eventually.
Camping Repair Near Me Guasti, CA
If your RV is experiencing this, allow our expert team analyze the damages and do a total paint repair work on your recreational vehicle, full with personalized paint, a clear layer application, and decal fixing or substitute - Camper Roof Repair Guasti. A tire blowout can cause many problems. Yes, the tire will certainly require to be replaced, yet you may also have extra parts or parts harmed throughout the blowout
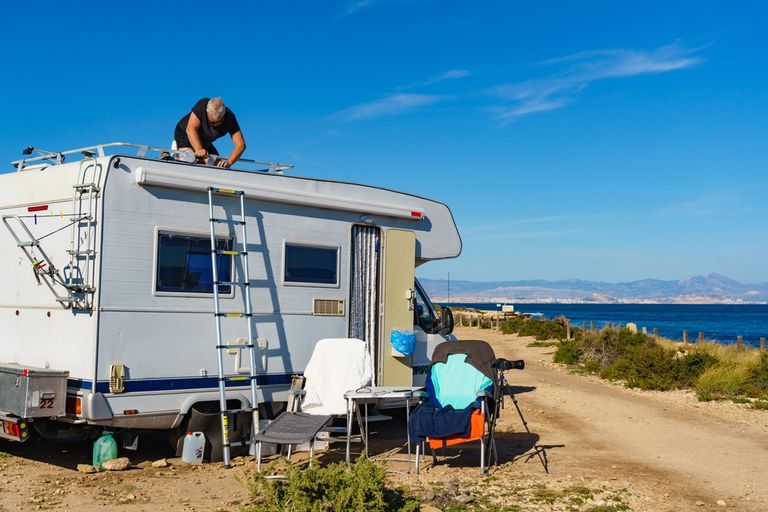
Recreational vehicle roof coverings truly take a beating between the hot sunlight, stormy weather condition, and everything in between. Normal upkeep can assist with long life, however at some factor, you'll need to fix or change your Recreational vehicle's roof covering.
Windshields and windows can be harmed like any various other component of your Recreational vehicle. We have the capability to do home window fixings on all kinds of Motor homes.
Awning and slide mattress toppers are usually damaged or just become worn out. If you see your awning or slide topper not functioning properly, allow our service group check them and make the required repair services. Tornado damage happens, and when it does you require a specialist that really recognizes the ins and outs of your recreational vehicle.
Pop Up Camper Repair Guasti, CA
Holding tank problems are feared by all motor home owners. Fortunately is you do not have to take care of it. Allow our expert team repair work or replace your holding containers when something goes awry. If you have repairs that are covered by your original equipment guarantee, after that the Outdoor camping Globe service and treatment group can look after it, allowing you to return on the road.
Trying to make repair services on your own can be a tough and aggravating experience. Connecting to mobile motor home repair in New Port Richey is a wonderful method to look after any kind of issues with your water heating unit in a timely manner. Our extremely knowledgeable specialists excel in both routine maintenance and urgent fixings, guaranteeing that your hot water heater will certainly constantly supply warm water whenever you require it.
We understand how useful your leisure automobile is to you, which's why we apply our expertise and interest to ensure it remains in its ideal condition. Whether we're performing regular maintenance or reacting to an emergency situation fixing demand, our emphasis is always on giving the ideal service that leads to the ideal performance of your lorry.
Camper Service Center Guasti, CA
There's the unexpectedthe fixings you might or might not have actually been prepared for. The replacement components, system fixes, service concerns, and general wear-and-tear on the motor home itself accumulate, and these can rapidly exceed the cash you've saved money on travel expenses (Camper Roof Repair Guasti). That's why it's so crucial to keep mechanical break down insurance for aid with those unanticipated repairs, as ESP can save you packages with these common financial savings over time.
OCRV Center
Address: 23281 La Palma Ave Yorba Linda, CA 92887Phone: (714) 909-1444
Email: art@ocrvcenter.com
OCRV Center
If you require to get your RV fixed or serviced, make an appointment today at Camping Globe's service department. Register today for the Great Sam Extended Solution Plan and make certain your RV or automobile is covered in the occasion of a mechanical failure. Nearly all Motor homes will certainly require a major repair within the initial 8 years of their life expectancy.
Camper Roof Repair Guasti, CARv Camper Repair Guasti, CA
Camper Services Guasti, CA
Camper Roof Repair Near Me Guasti, CA
Camper Repair Guasti, CA
Rv Camper Repair Near Me Guasti, CA
Camper Trailer Repair Guasti, CA
Camper Roof Repair Near Me Guasti, CA
Camper Services Guasti, CA
Pop Up Camper Roof Repair Guasti, CA
Camper Service Guasti, CA
Camper Air Conditioner Repair Near Me Guasti, CA
Camping Repair Near Me Guasti, CA
Camper Repair Shops Near Me Guasti, CA
Camper Repair Places Near Me Guasti, CA
Camper Repair Shop Guasti, CA
Camping Repair Near Me Guasti, CA
Camper Repair Guasti, CA
Camper Awning Replacement Guasti, CA
Camper Service Guasti, CA
Camper Service Guasti, CA
Pop Up Camper Repair Guasti, CA
Camper Trailer Repair Guasti, CA
Camper Services Guasti, CA
Pop Up Camper Canvas Repair Guasti, CA
Pop Up Camper Roof Replacement Guasti, CA
Camper Repair Shop Guasti, CA
Camper Repair Near Me Guasti, CA
Camper Trailer Repair Guasti, CA
Camper Repair Near Me Guasti, CA
Camping Repair Near Me Guasti, CA
Camper Repair Shop Near Me Guasti, CA
Camper Roof Replacement Guasti, CA
Camper Repair Shop Near Me Guasti, CA
Camper Repair Shop Near Me Guasti, CA
Camper Service Center Guasti, CA
Camper Awning Replacement Guasti, CA
Camper Trailer Repair Guasti, CA
Camper Trailer Repair Near Me Guasti, CA
Camper Roof Replacement Guasti, CA
Camper Trailer Service Near Me Guasti, CA
Camper Trailer Service Near Me Guasti, CA
Camper Roof Repair Near Me Guasti, CA
Camper Service And Repair Guasti, CA
Pop Up Camper Roof Repair Guasti, CA
Camper Roof Replacement Guasti, CA
Camper Repair Near Me Guasti, CA
Camper Repair Shops Near Me Guasti, CA
Camper Roof Replacement Guasti, CA
Camper Roof Replacement Guasti, CA
Camper Repair Shop Guasti, CA
Camper Services Guasti, CA
Camper Trailer Repair Guasti, CA
Pop Up Camper Repair Near Me Guasti, CA
Camper Roof Replacement Guasti, CA
Camper Services Guasti, CA
Camper Repair Shops Near Me Guasti, CA
Camper Awning Replacement Guasti, CA
Rv Camper Ac Repair Guasti, CA
Camper Awning Replacement Guasti, CA
Camper Repair And Service Guasti, CA
Camper Service Guasti, CA
Camper Service Near Me Guasti, CA
Camper Awning Repair Guasti, CA
Rv Camper Repair Near Me Guasti, CA
Camper Air Conditioner Repair Near Me Guasti, CA
Camper Awning Repair Guasti, CA
Camper Air Conditioner Repair Near Me Guasti, CA
Camper Awning Replacement Guasti, CA
Rv Camper Repair Near Me Guasti, CA
Camper Repair Shop Guasti, CA
Camper Awning Replacement Guasti, CA
Camper Trailer Repair Near Me Guasti, CA
Pop Up Camper Roof Repair Guasti, CA
Camper Awning Repair Guasti, CA
Rv Camper Repair Guasti, CA
Camper Roof Repair Guasti, CA
Camper Repair Shop Guasti, CA
Near You Seo Optimization Services Guasti, CA
Find Seo Package Guasti, CA
Camper Roof Repair Guasti, CA
OCRV Center
Table of Contents
- – Pop Up Camper Roof Replacement Guasti, CA
- – OCRV Center
- – Camper Trailer Repair Near Me Guasti, CA
- – Camper Services Guasti, CA
- – Rv Camper Ac Repair Guasti, CA
- – Camper Repair And Service Guasti, CA
- – Camper Service Guasti, CA
- – Camper Service And Repair Guasti, CA
- – Camper Repair Guasti, CA
- – Camping Repair Near Me Guasti, CA
- – Pop Up Camper Repair Guasti, CA
- – Camper Service Center Guasti, CA
- – OCRV Center
Latest Posts
Truck Shops Near Me Guasti
Rv Chairs Tustin
Emergency Swamp Cooler Repair Beverly Hills
More
Latest Posts
Truck Shops Near Me Guasti
Rv Chairs Tustin
Emergency Swamp Cooler Repair Beverly Hills